Neatline Plugin

Building an interactive map using Omeka’s Neatline plugin

Neatline is a plugin for Omeka that allows for the creation of interactive maps and timelines. Neatline allows the user to plot points on geospatial layers that, when clicked, reveal text and media. Users may create records from scratch and add them to their Neatline exhibits, or import existing items from Omeka. See Neatline.org for demos of this tool in action and more documentation.

Before using this tool, you’ll need to install the Neatline plugin to Omeka. If you’ve already installed the Escher plugin, you can use it to install Neatline. If not, follow the instructions on the “Installing Plugins” section of this support page.

Vocabulary

Item: Omeka’s basic building block, containing text, media, and/or metadata.
Collection: A group of items, typically sharing a common theme.
Record: Neatline’s version of items. Can be created on their own, or imported from an existing item in Omeka.
Exhibit: A Neatline map or timeline; contains your records.
Widget: An add-on tool for Neatline, such as Waypoints.
Spatial layer: A navigable map that Neatline can use, typically pulled from Google Maps. The various options Neatline offers have different aesthetics.

Setting up (first time only)

1. Install the Neatline plugin (see above). Install any additional supporting plugins you’d like, such as Neatline Waypoints.

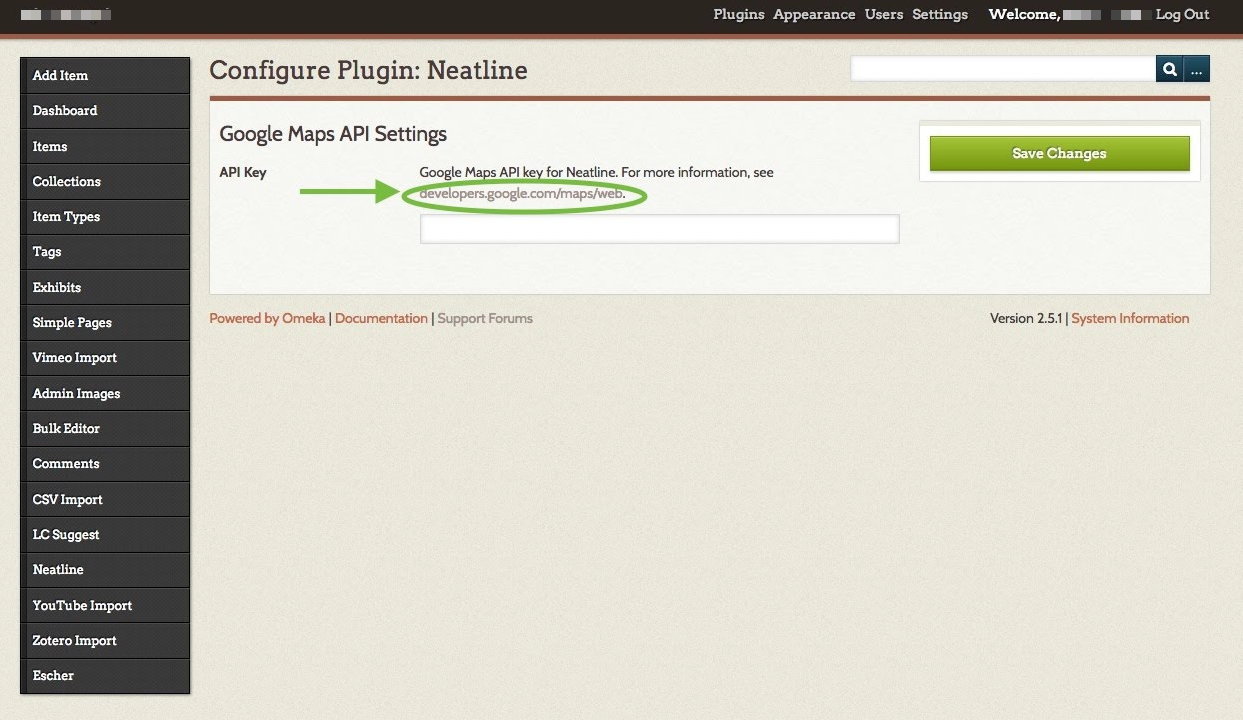
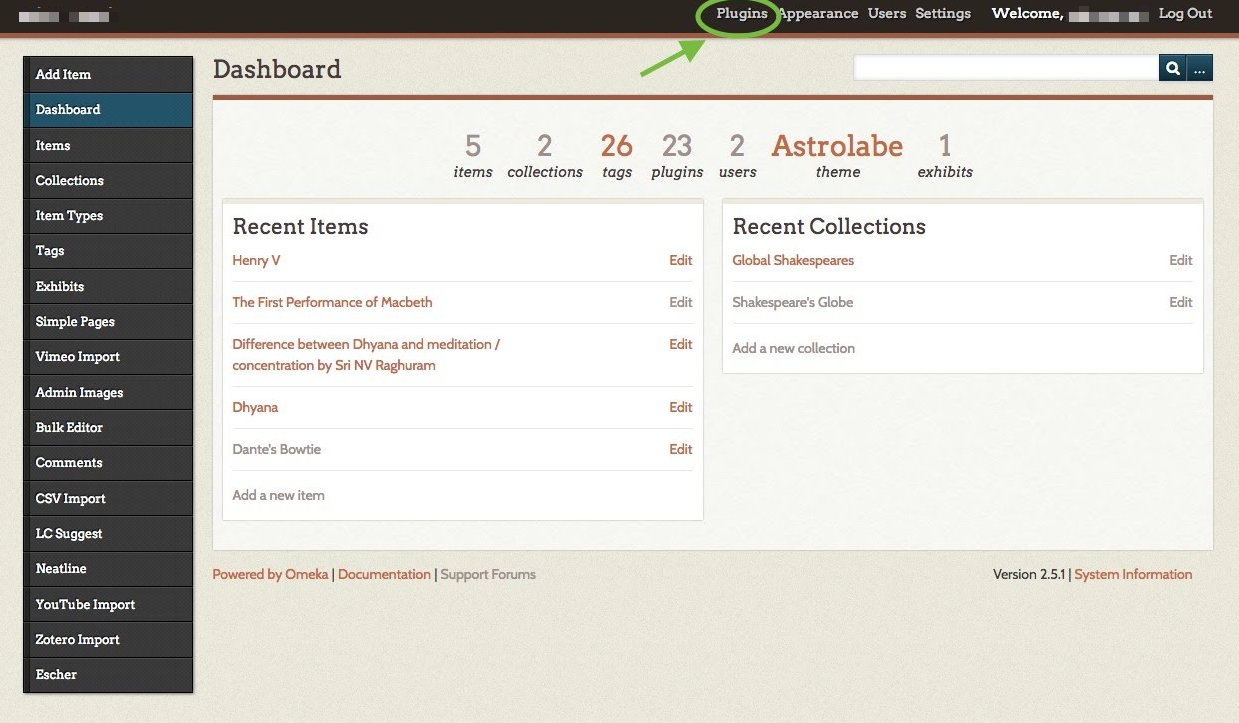
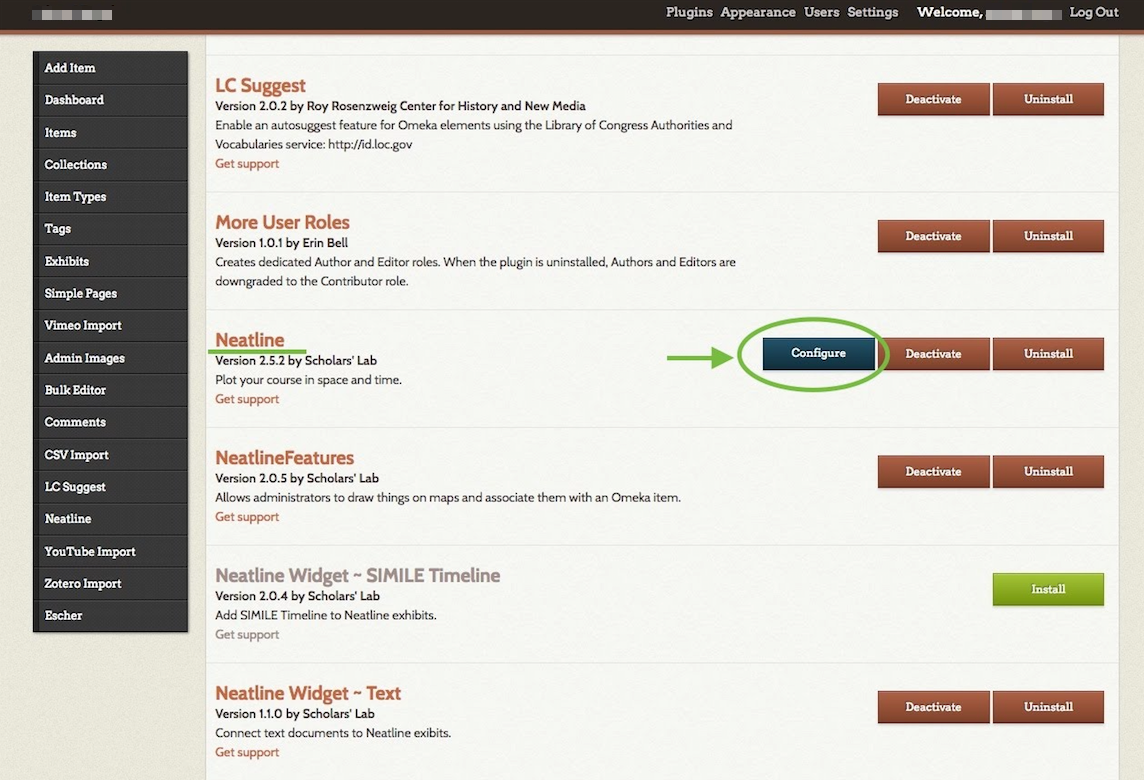
2. Go to your Plugins page in Omeka. Then, click “Configure” to the right of Neatline. On the configuration page, click the link to developers.google.com/maps/web. If possible, open this link in a new tab, since you’ll soon need to return to the configuration page.
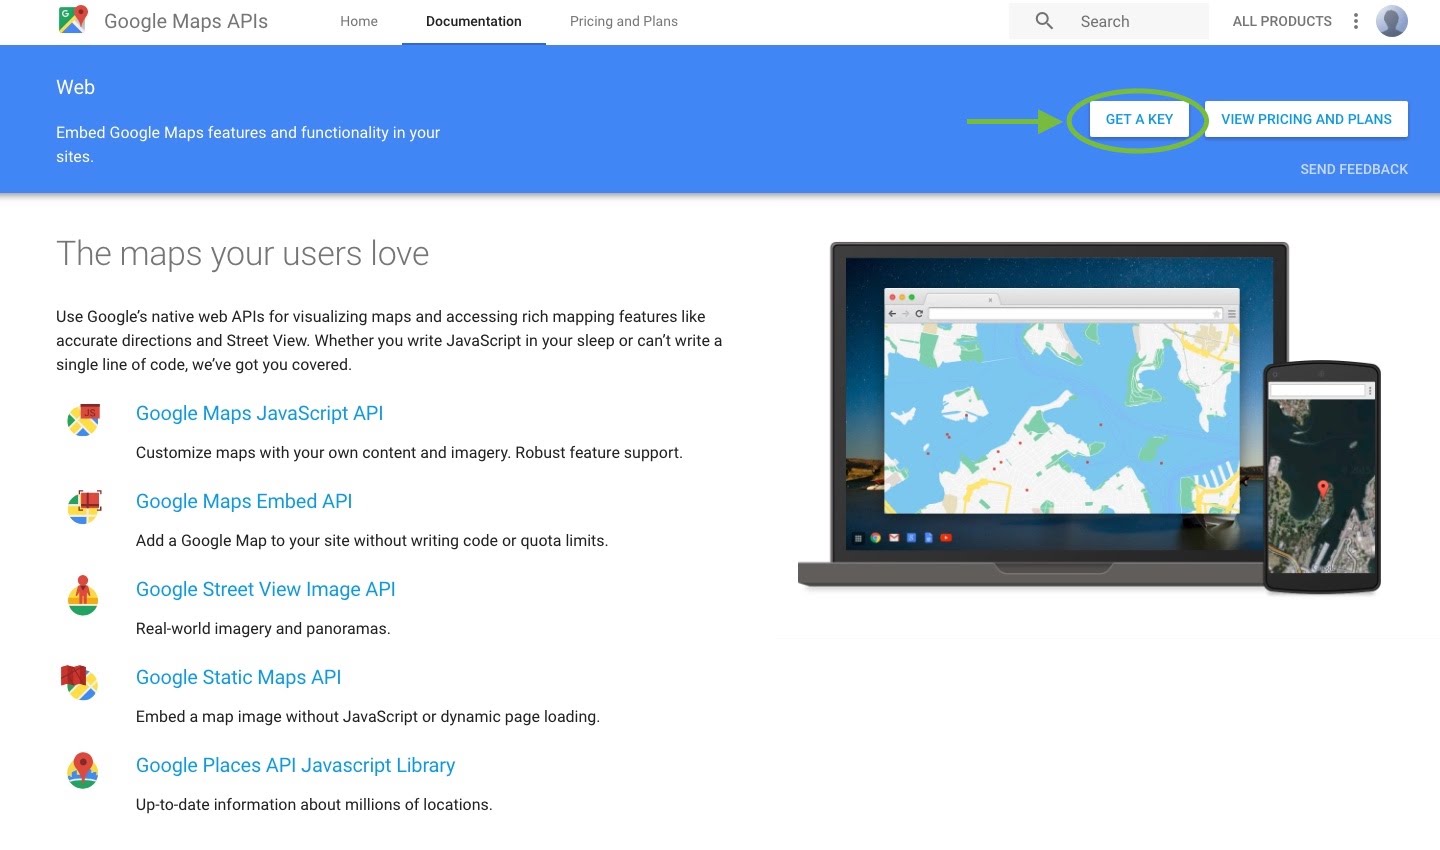
3. On the Google page that opens, click the “GET A KEY” button at top right. Follow the prompts in the pop-up window to create a new project, named whatever you’d like (this title won’t matter for your Neatline projects). When you’re given a long string of characters, copy it. This is your Google Maps API Key. You’ll only need it once.
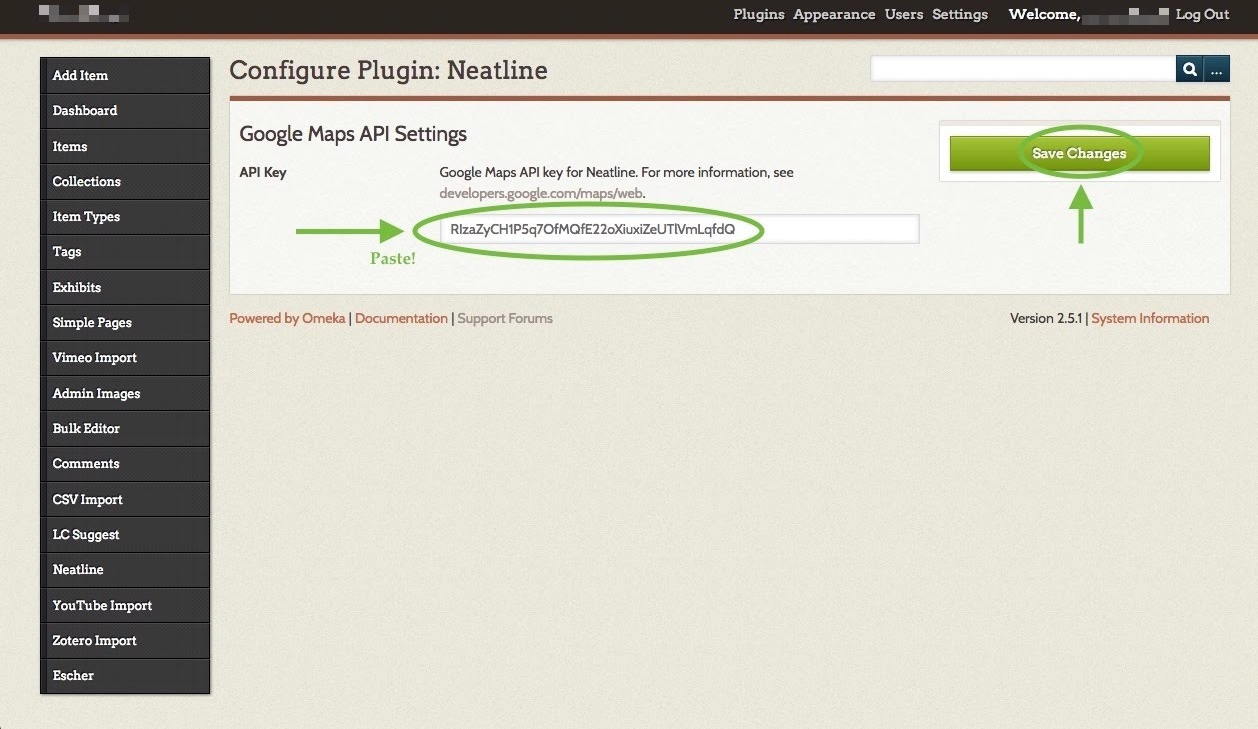
4. Return to the Neatline configuration page from step 2. Paste your API Key into the text box. Then click the green “Save Changes” button. Neatline is now connected to Google Maps.
5. Click Settings at top right of your Omeka dashboard. In the text box to the right of “ImageMagick Directory Path,” enter this exact text without the quotation marks: “/usr/bin”. Then click the green Save Changes button at top right. This will allow Omeka to handle your images properly.

Neatline is now ready to go!

Laying the foundation

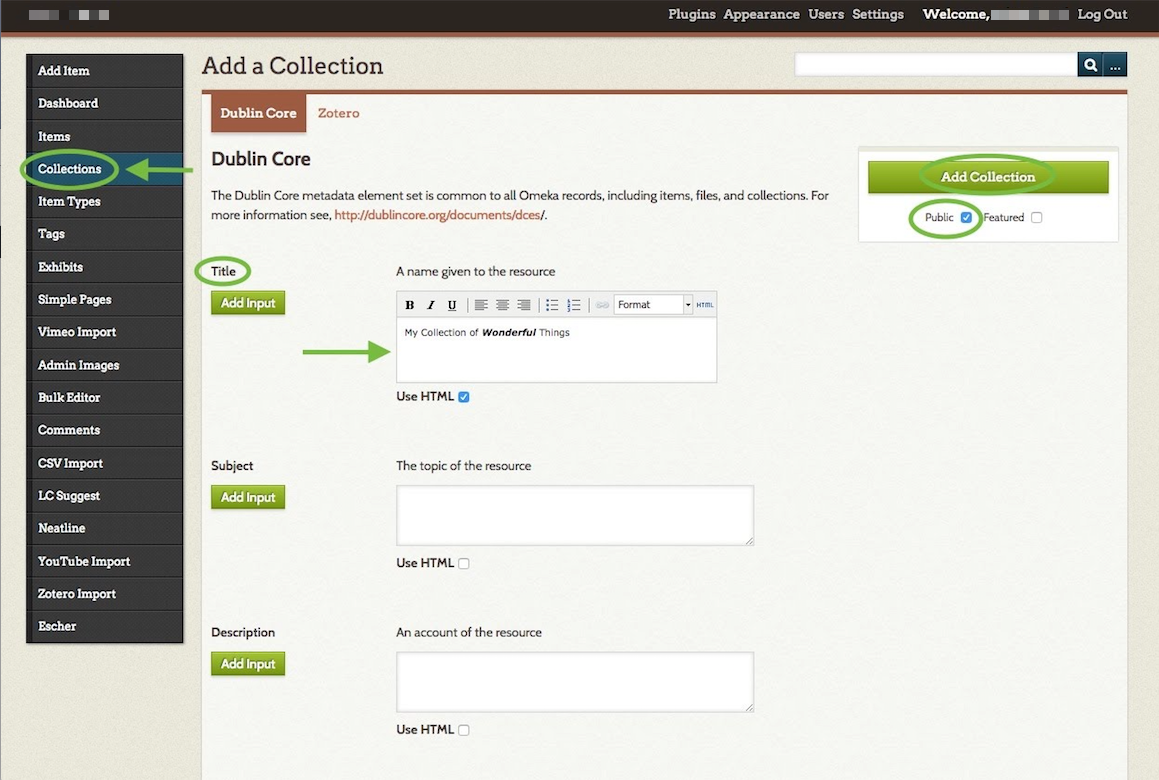
1. Optional: create one or more collections. This is an organizational tool: by creating collections now, you’ll be able to sort your items or bulk import them to Neatline more easily later. To create a collection, click “Collections” on your lefthand Omeka dashboard menu. Then, click the green Add a Collection button. On the Add a Collection page, give your collection a Title (you can leave all other boxes blank). If you want to add formatting to your text such as bolding or italics, check the box next to “Use HTML,” and more editing options will appear.

When you’re done, check the box next to “Public” and then click the green Add Collection button.

NOTE: You’ll see many fields when creating collections or items, but there’s no need to panic: almost all are optional and exist for archival purposes. Only fields with a * after them are required.
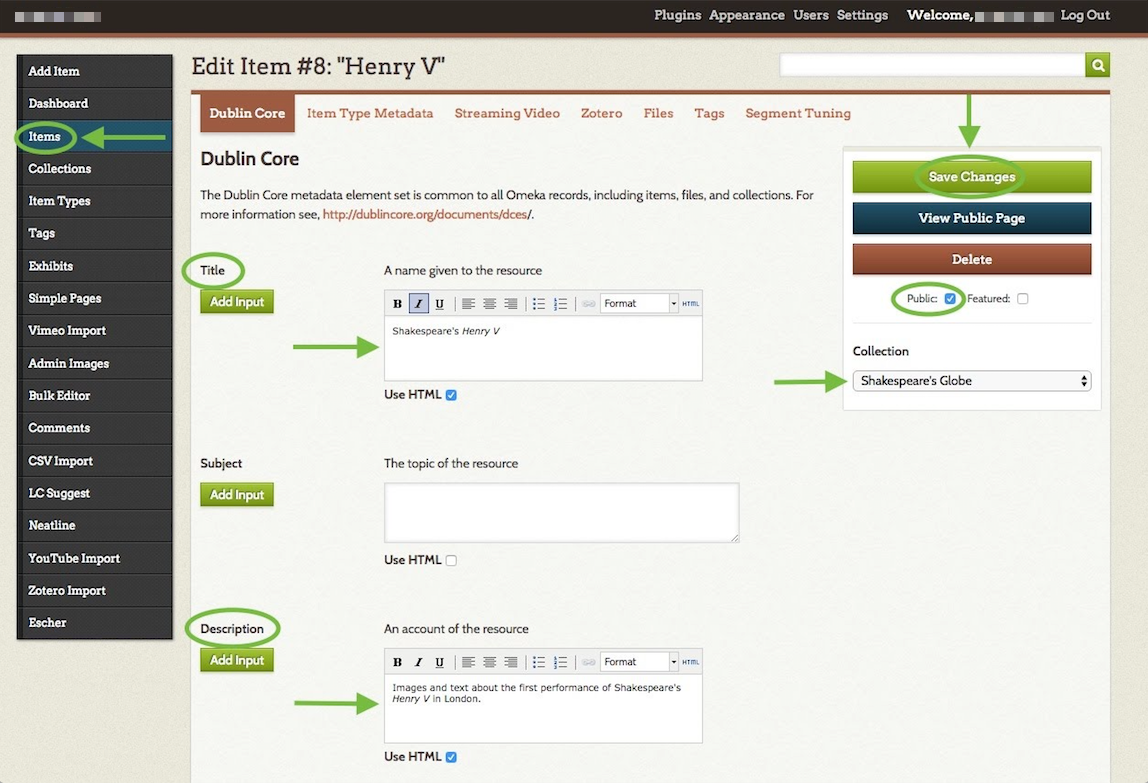
2. Begin creating items. Omeka is a tool for curating artifacts. In this step, you’ll begin this curation by creating items. To create an item, click “Items” on your lefthand Omeka dashboard menu. Then, click the green Add an Item button. On the Add an Item page, give your item a Title and a Description (you can leave all other boxes blank). This is the text that will ultimately appear to viewers of this record on your Neatline map. If you want to add formatting to your text such as bolding or italics, check the box next to “Use HTML,” and more editing options will appear.

Check the box next to “Public.” If you wish to add this item to a collection, select it from the dropdown menu under “Collection.”

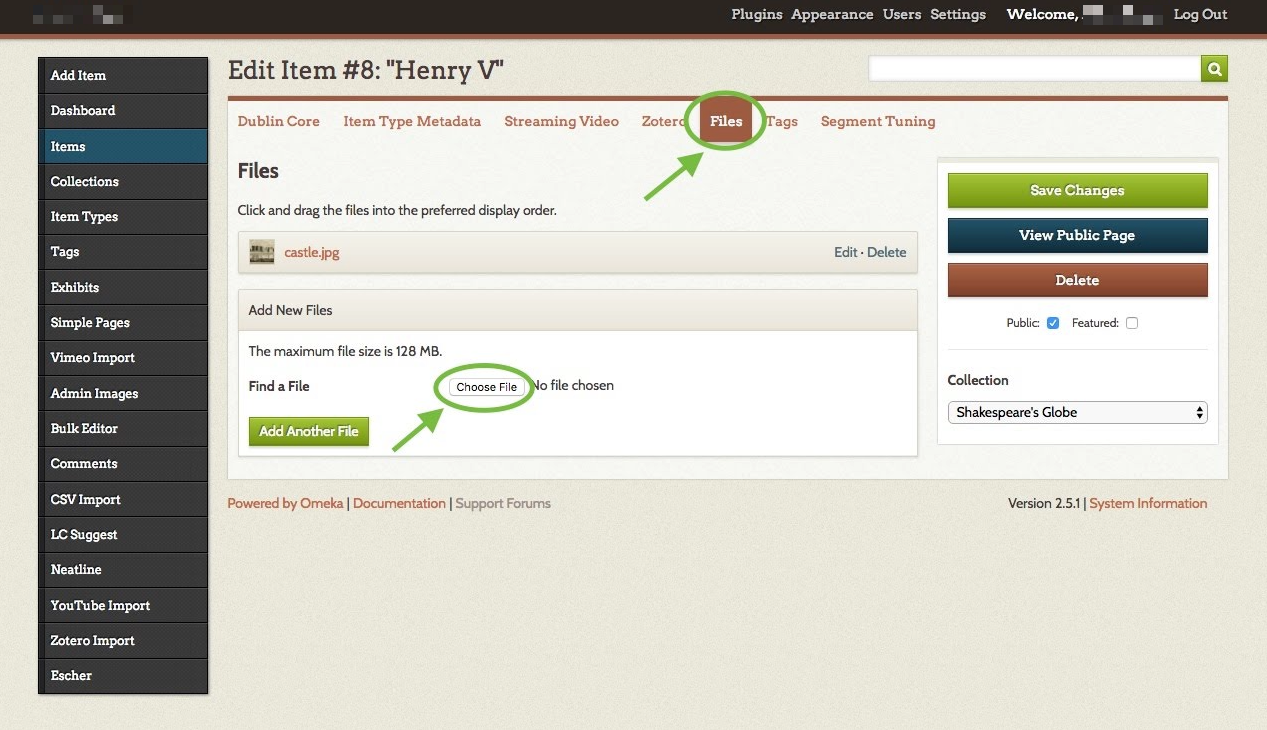
If you wish to add images to your item, click the “Files” tab, then click “Choose File.” Follow the prompts to upload an image. To upload more images, click the green Add Another File button. These images will be displayed alongside your text when a viewer clicks the relevant point on your map.

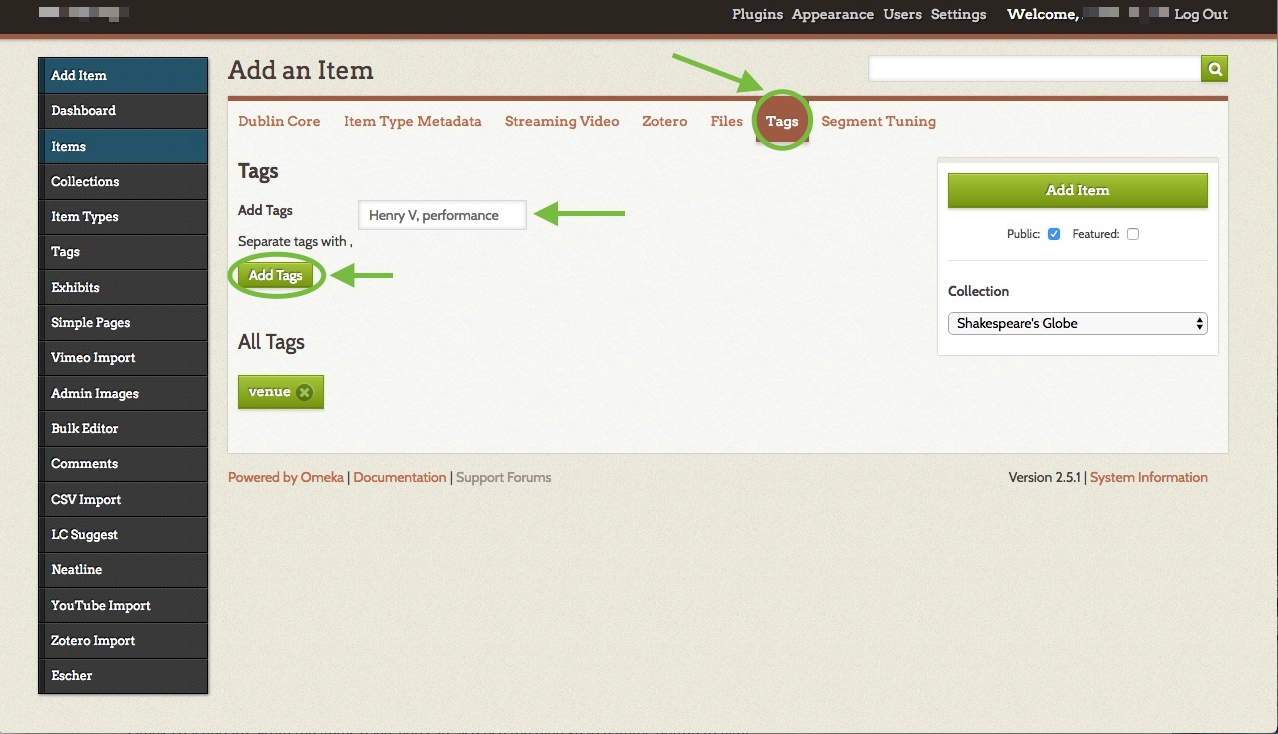
If you wish to add tags to your item, click the “Tags” tab, then enter all desired tags in the text box, separated by commas. Remember to click Add Tag afterward.
When you’re done adding text, files, and tags, click the green Add Item (or Save Changes if you’re editing) button.

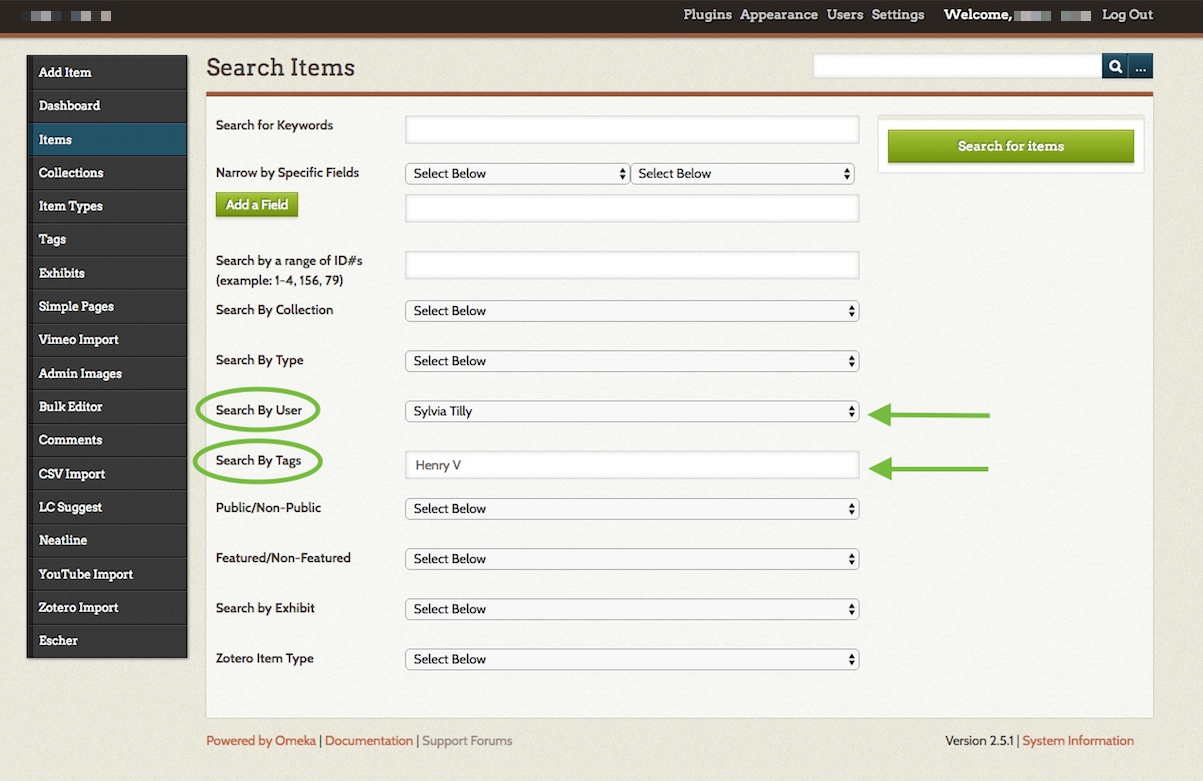
You can always find your list of items, with the option to edit each one, by clicking Items on your Omeka dashboard. From the Items page, you can also use the blue Search Items button to filter items by user or tag.
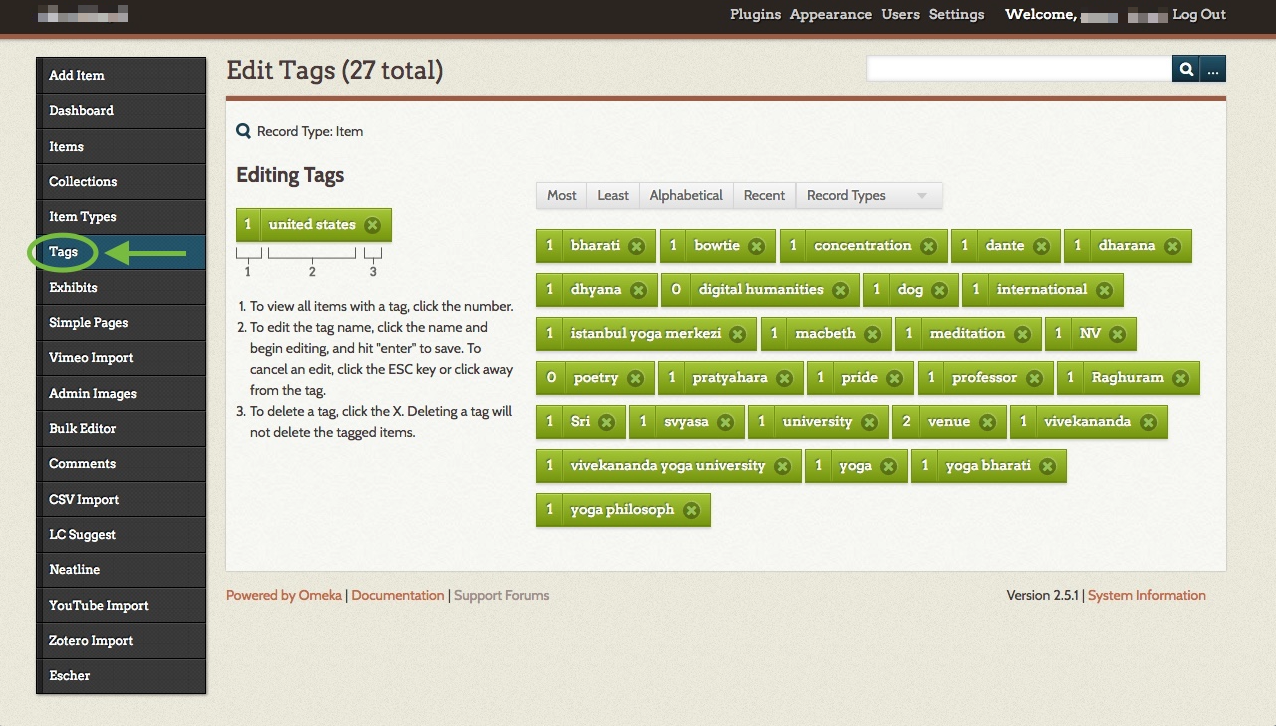
Clicking “Tags” on the Omeka dashboard will bring you to a list of all your tags. Click a tag’s name to edit it, or click the number to its left to view all items with that tag.
Managing Neatline exhibits and using the editor

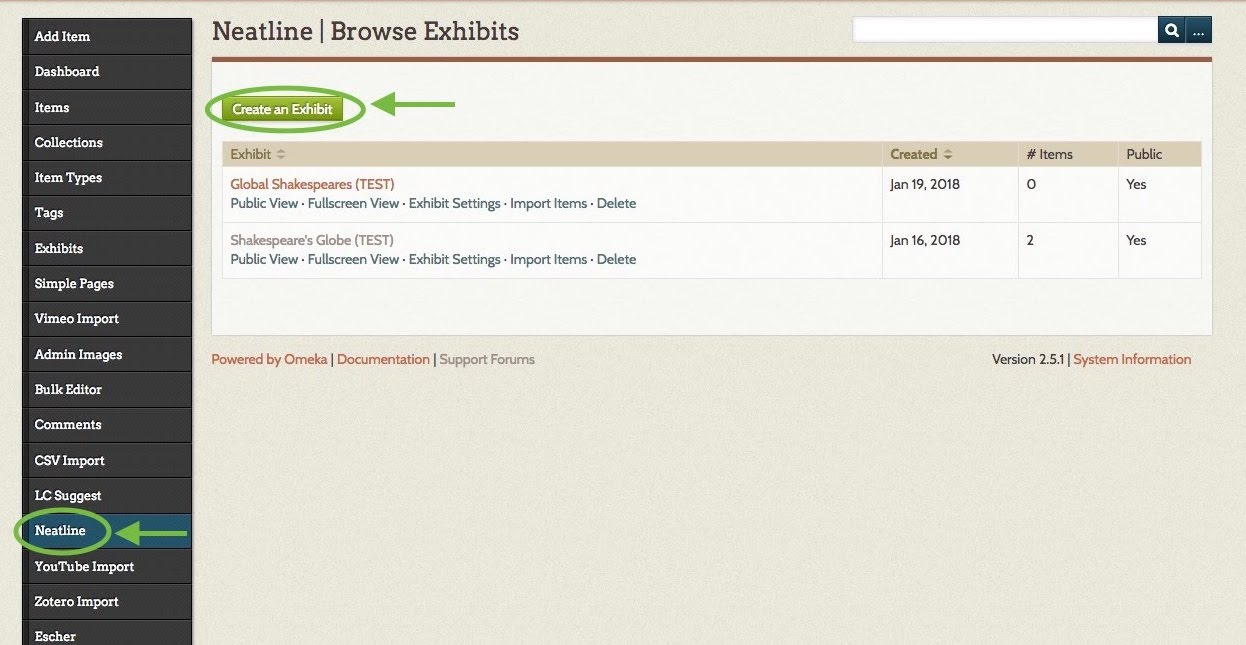
1. Create an exhibit. Your Neatline map will be known as an exhibit. It’s now time to create this map. Click Neatline on the lefthand dashboard menu, which brings you to the Browse Exhibits page. Then click the green Create an Exhibit button.
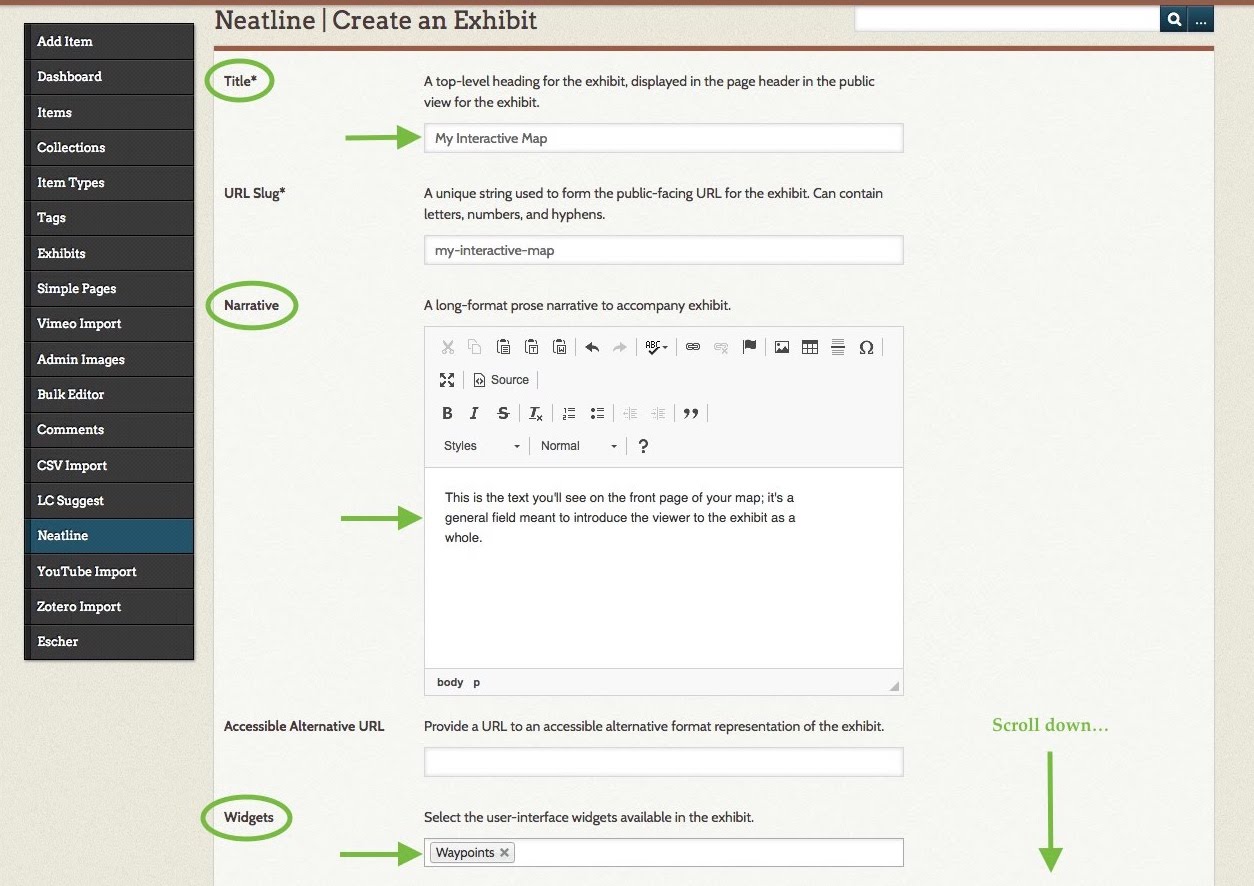
On the Create an Exhibit page: give your exhibit a Title, Narrative (optional but recommended), and Widgets (if you’d like to use Waypoints or another add-on you’ve previously installed). The Narrative is the exhibit’s primary textual description, and it will appear alongside your map.
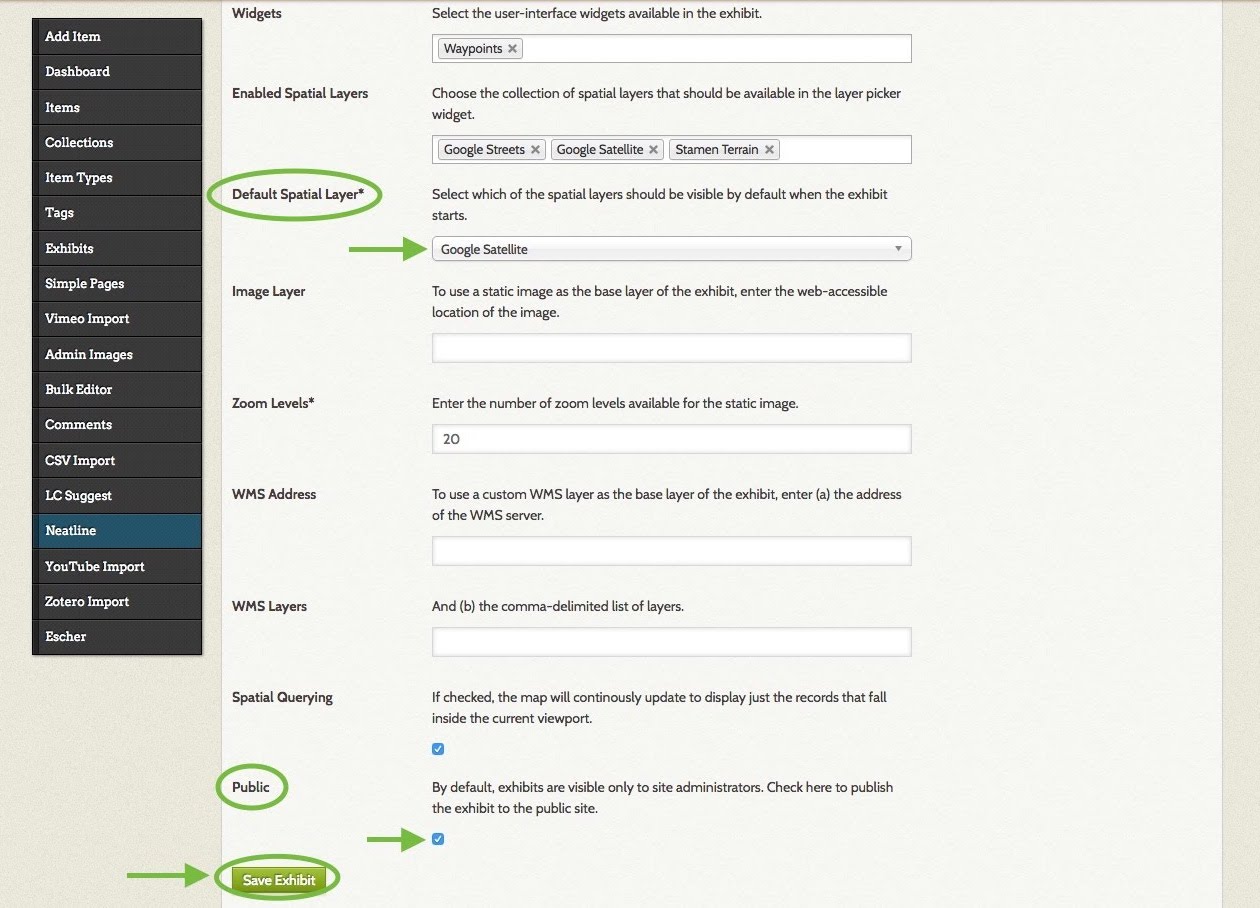
Scroll down and select a Default Spatial Layer from the drop-down menu. The Default Spatial Layer is the default map style your exhibit will display. You can edit this any time, so try out a few and see which aesthetic you like best. You can also optionally use the Embed Spatial Layers field to allow your viewers to toggle between various map styles.

The only other setting you need to change here (eventually) is Public: when you check this box, your exhibit will be live. When you’re done, click the green Save Exhibit button at the bottom of the form.
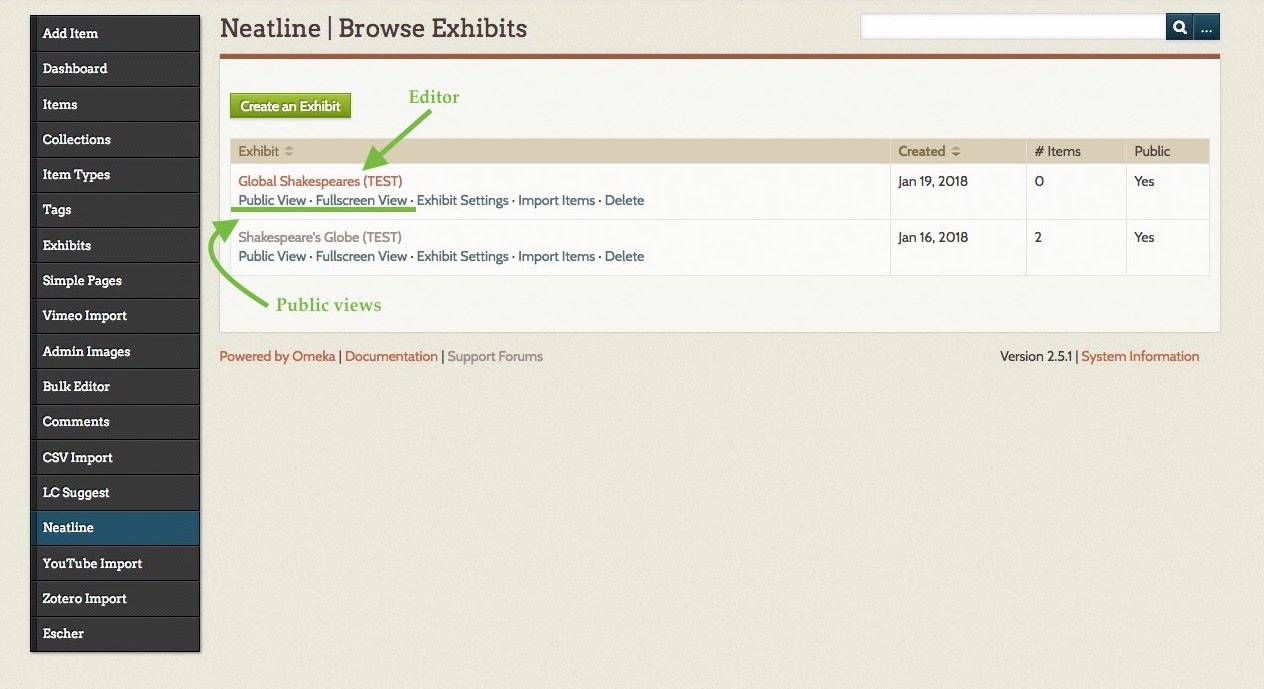
2. Access the Neatline editor. Return to the Browse Exhibits page from step 1. To access the editor, click your exhibit’s title. Clicking Public View or Fullscreen View will let you preview how your exhibit will look to visitors.
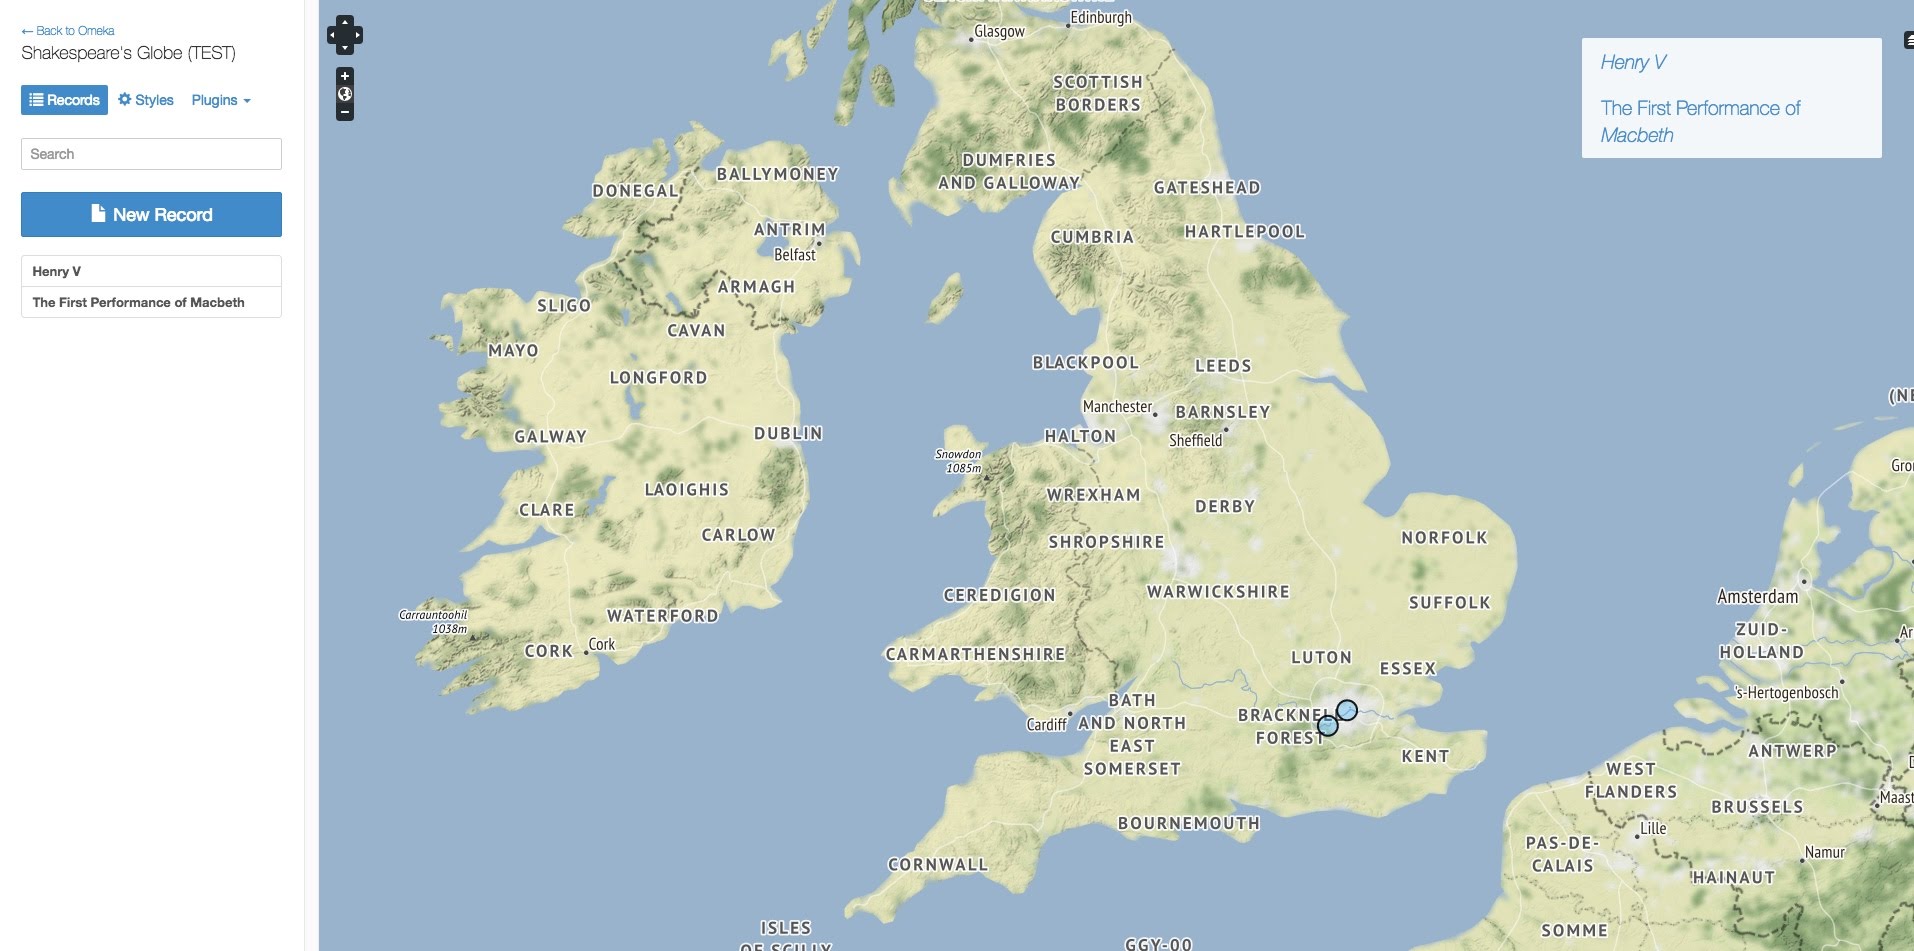
Here is what the editor looks like. Notice the Records, Styles, and Plugins tabs, and the list of records below the blue New Record button (there won’t be any records until you add some):
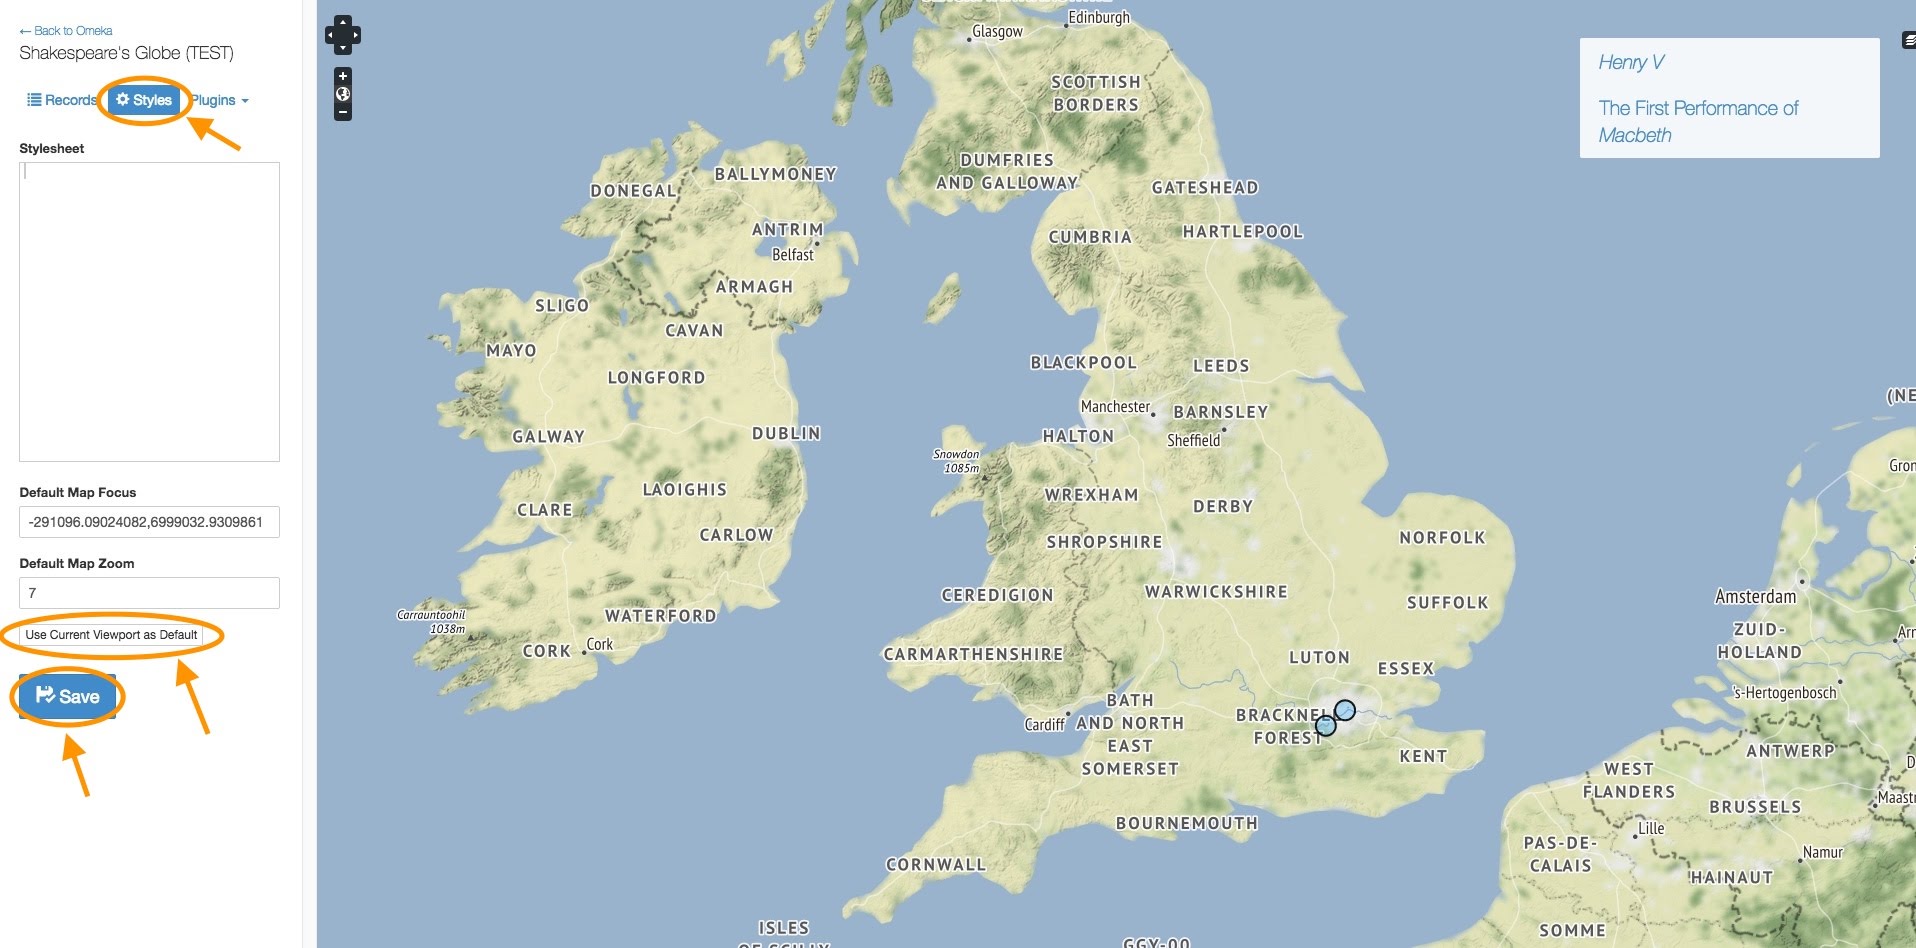
3. Set the default focus. This is the latitude/longitude and zoom that viewers will see when they first open your map (they’ll then be able to move it however they’d like). In the editor, click the Styles tab. Click and drag on your map to move it around, and use the + and – symbols at top left to zoom in and out. When you’re satisfied with the current view of the map, click the Use Current Viewport as Default button. This will automatically fill-in coordinates and the depth of zoom. You can also manually add these. When you’re done, click the blue Save button.
4. Import items into your exhibit, which then become records. First, click the Records tab in the editor. Then, click the large blue New Record button.
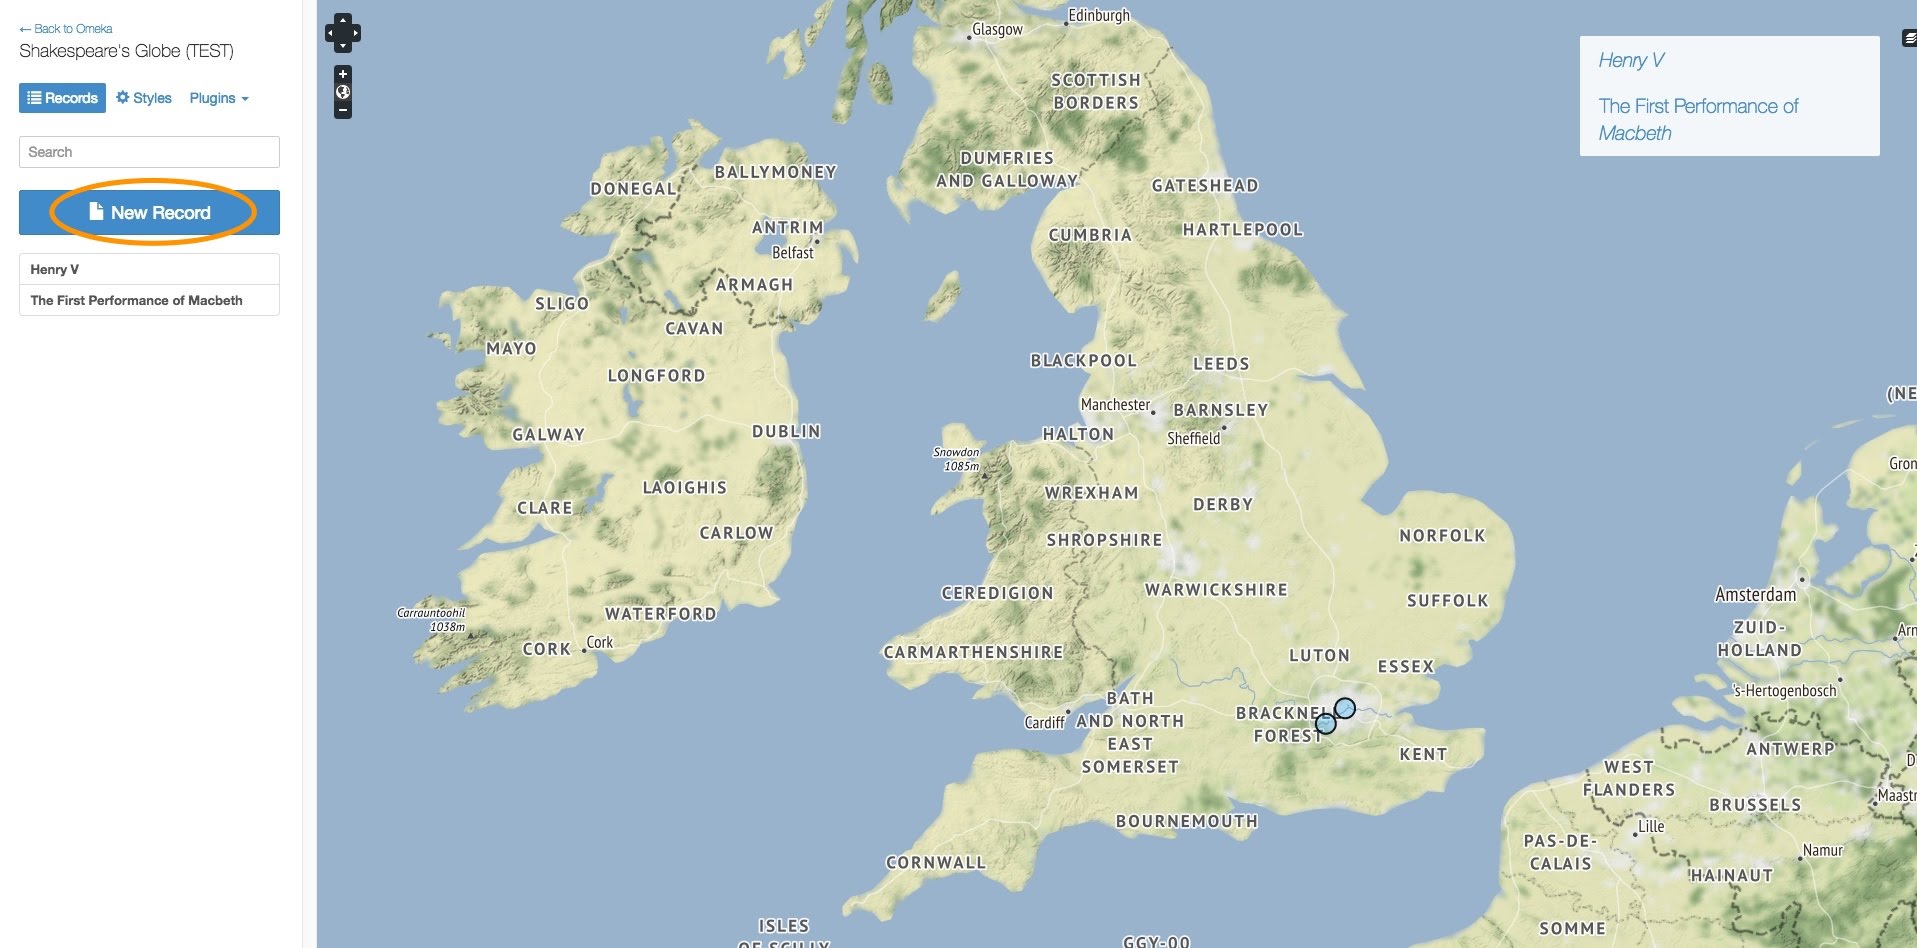
New tabs will appear. Click the Item tab. You’ll see a drop-down menu called “Search Omeka items.” This will list all the Omeka items you’ve previously created. Find the item you wish to add to the map and select it. The item’s content appears below the drop-down menu. If it looks correct, click the blue Save button. If not, click “View the item in Omeka,” edit the item, and try again.

NOTE: If you edit an item in Omeka that you’ve already imported into your Neatline exhibit, its record in the exhibit will be automatically updated.

NOTE #2: You can also create records from scratch using the New Record button and the Text tab (without making an Omeka item first). However, this isn’t recommended if you wish to include images or other media in your record, since that media would require additional HTML formatting.
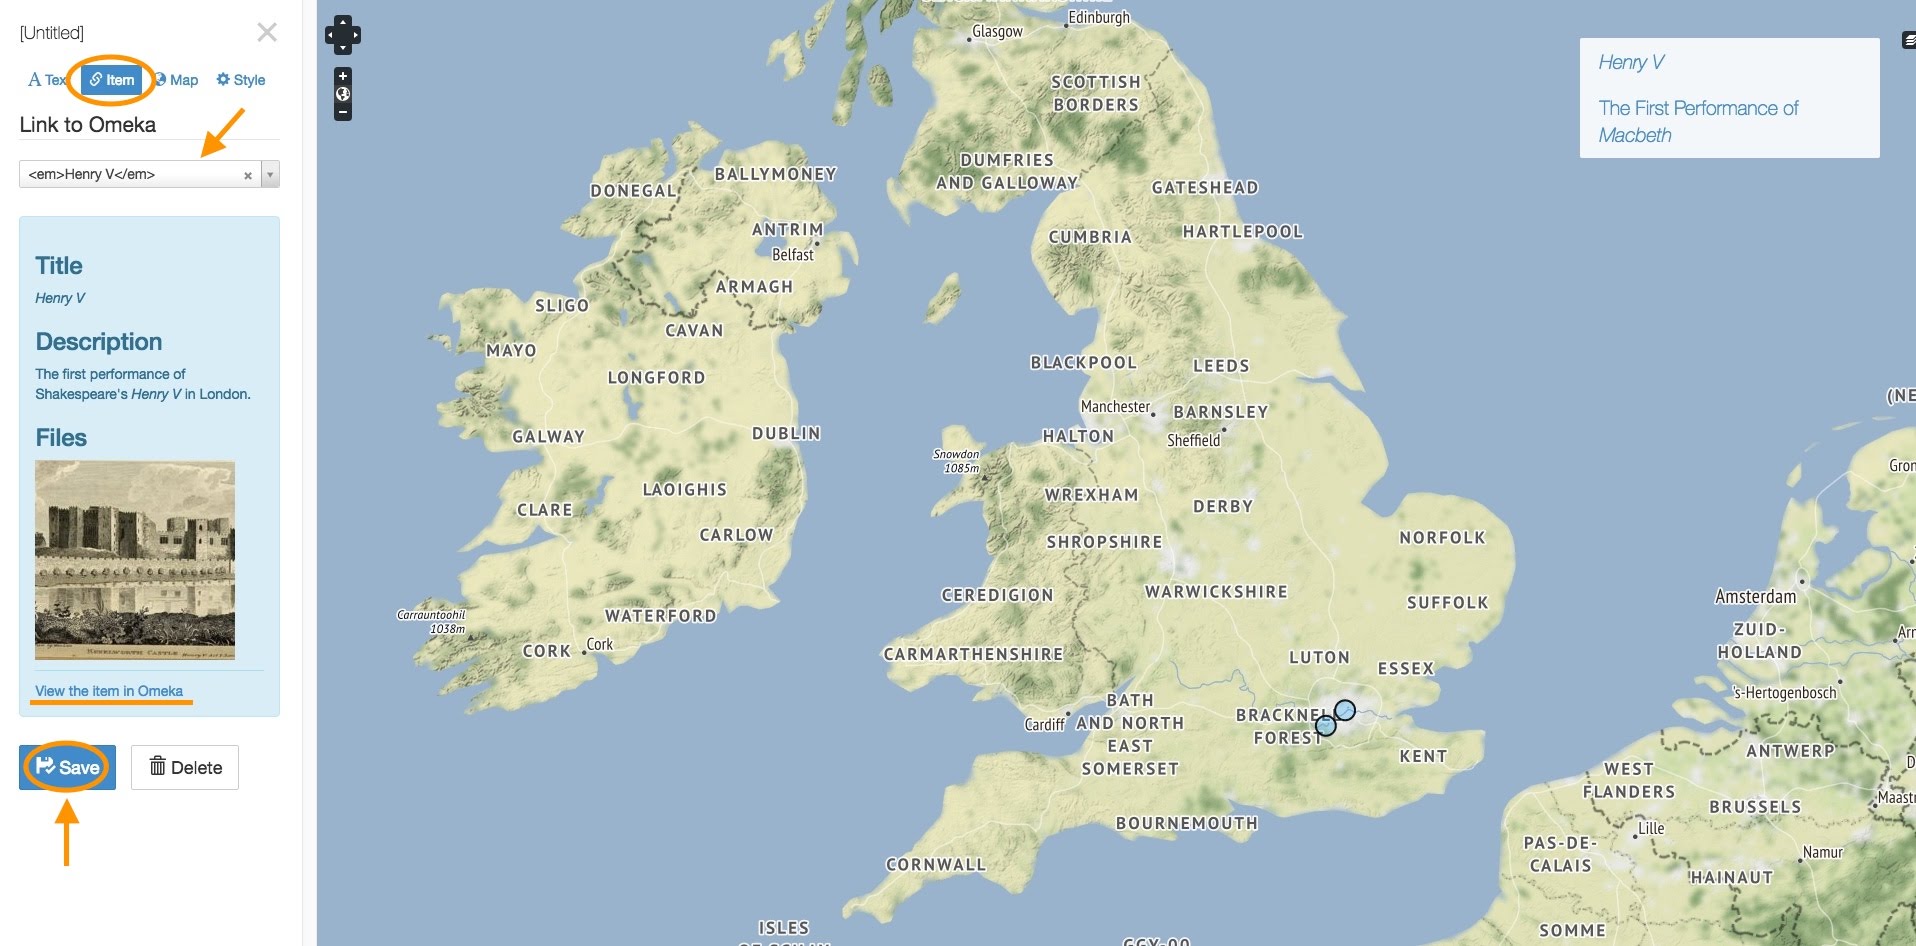
5. Pin your records to the map. You can access any of your records from the list of records on the editor’s main page (see the screenshot in step 2 of this section, looking under the New Record button). Once you’re in a record, you can place it on the map. If you’ve just created a record using the Item tab from the previous step, then you’re already in that record.

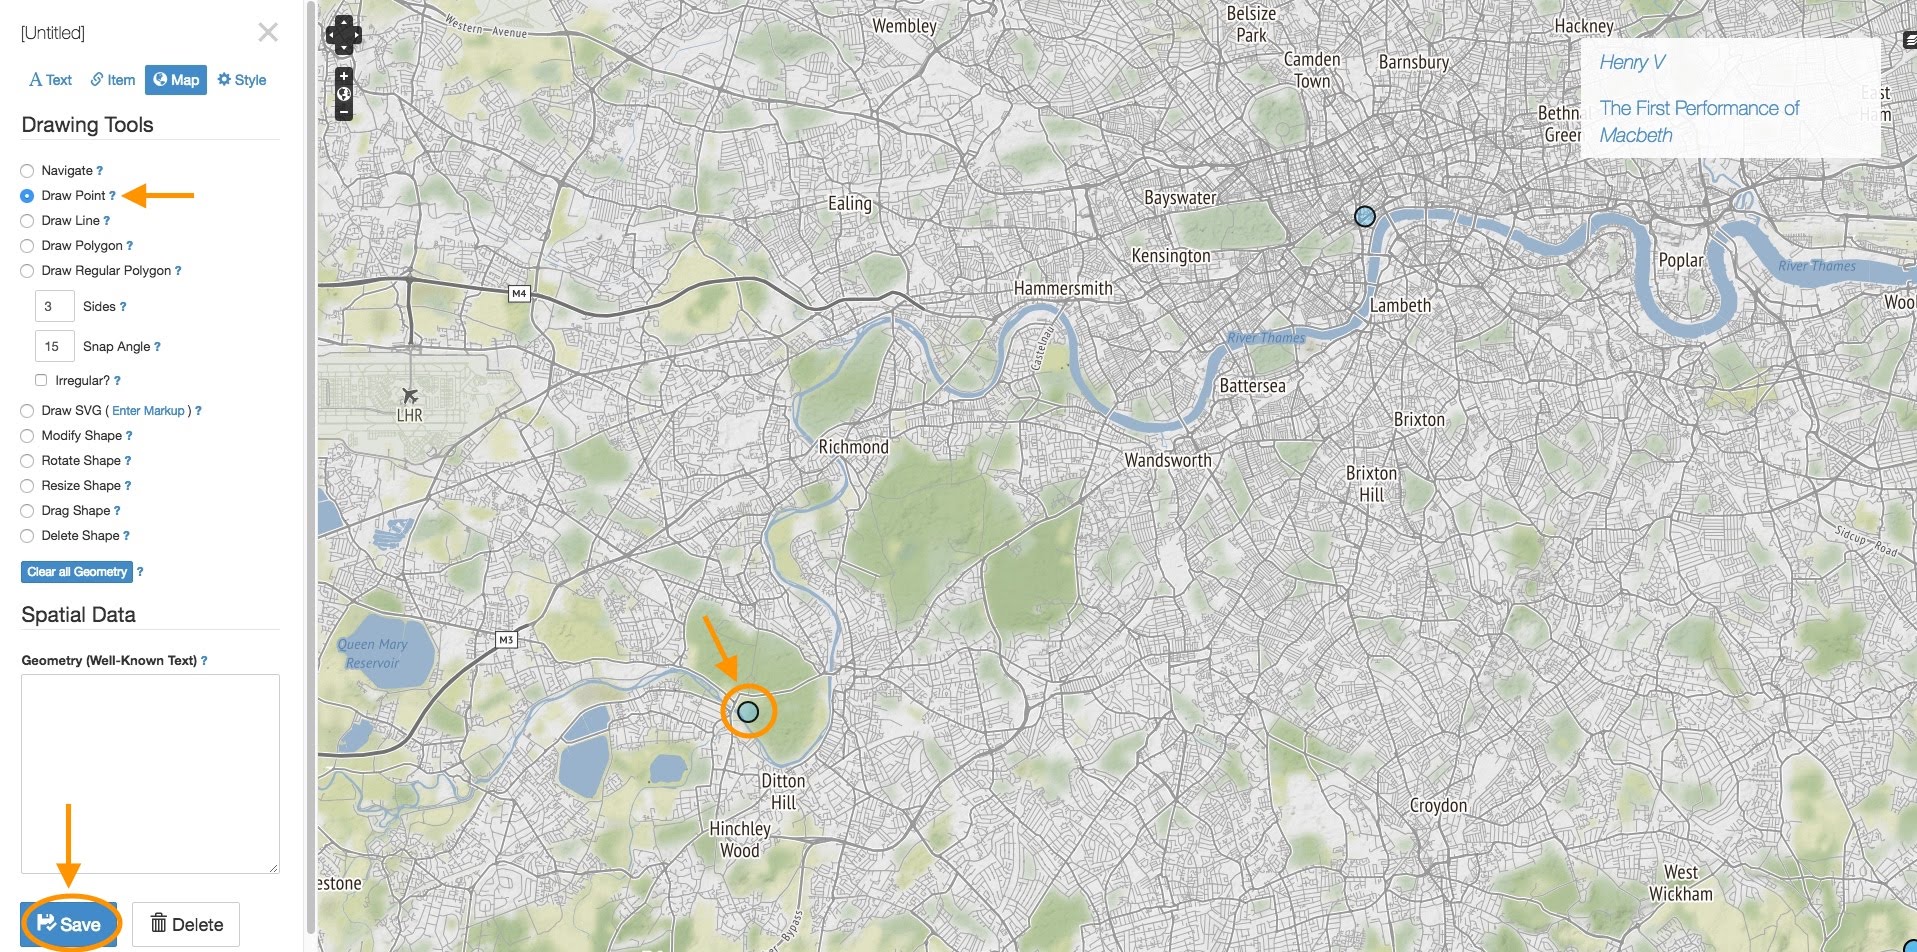
Once in the record, click the Map tab. You can draw many different shapes here (and feel free to experiment!), but for our purposes, we’ll look at two buttons: “Navigate” and “Draw Point.”

When “Navigate” is selected, you can move your map around without adding anything. When “Draw Point” is selected, you can click on the map to place a blue pin. When a viewer clicks this pin, she’ll see the record associated with it. When you’re done, click Save.

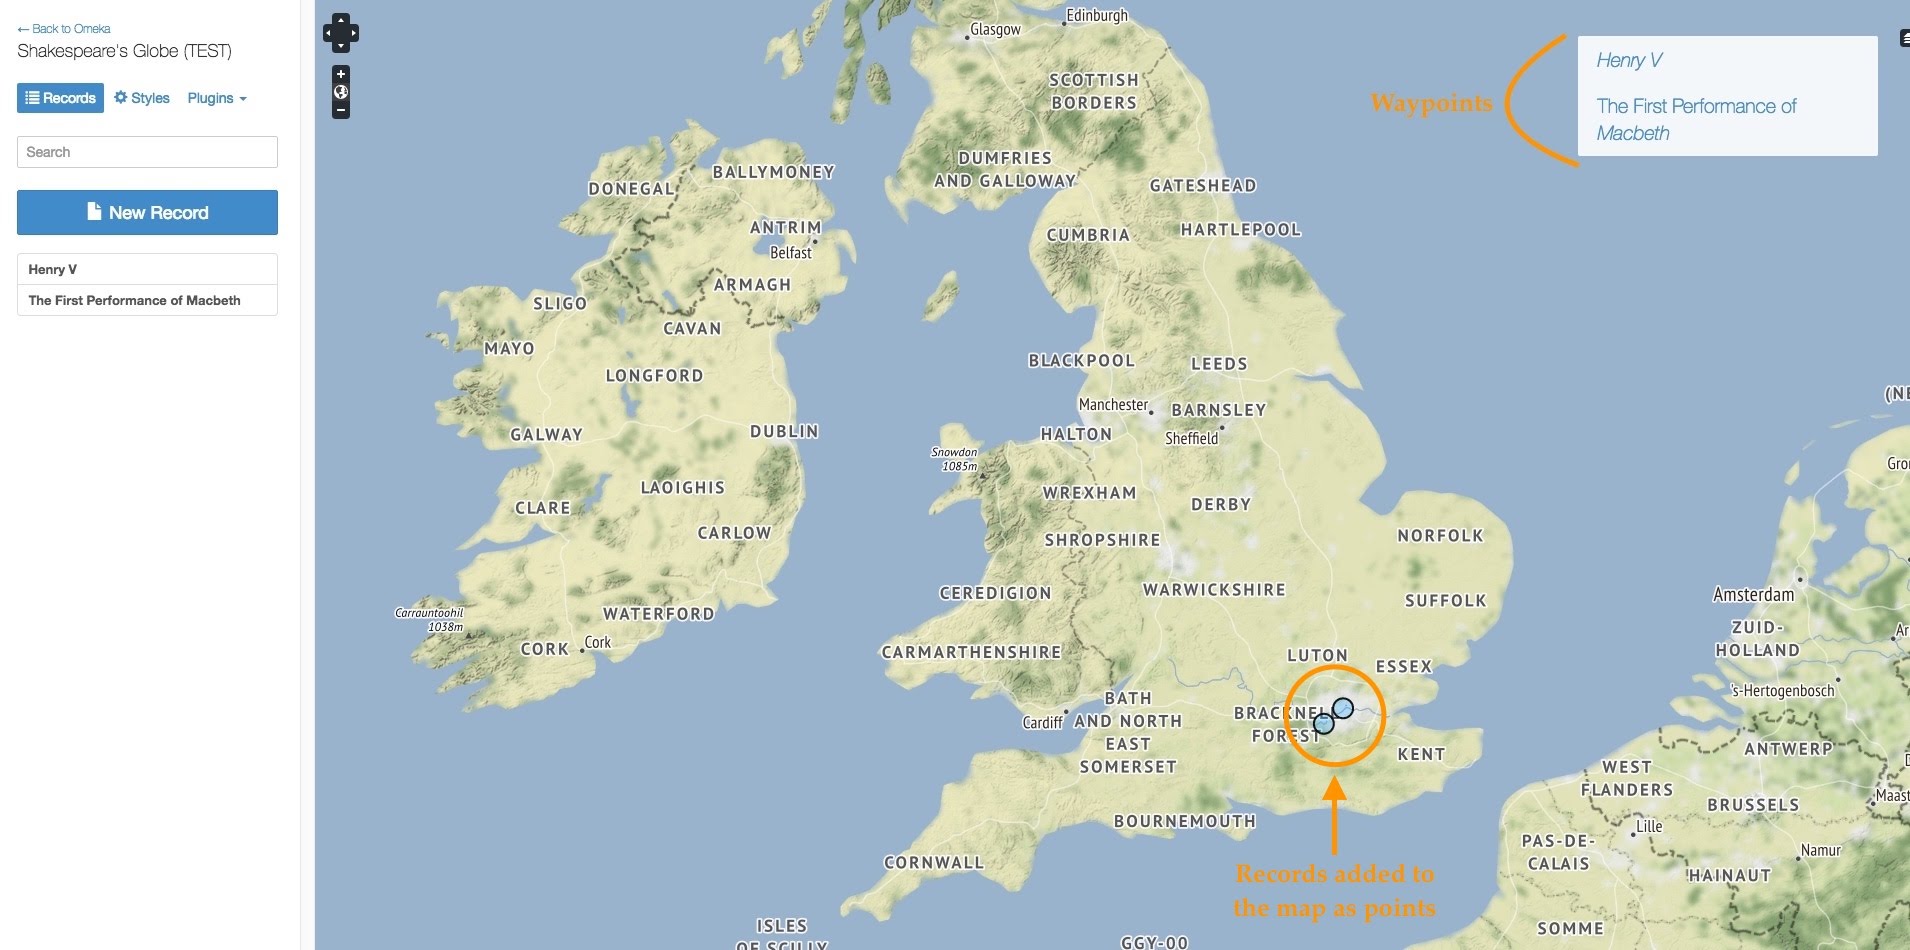
For example: I have a record containing text and images about Shakespeare’s first performance of Henry V in London. I can go into my Henry V record and use “Draw Point” to place a pin on London. Now, the viewer can click the blue dot on London to bring up this record.
Optionally, you can use the Style tab in a record (to the right of the Map tab) to change the appearance of points and shapes for that record.

You can add as many interactive points or shapes as you’d like.

6. Add widgets to your record (optional). If you’re using the Waypoints widget, select it by clicking in the Widgets field. See the next step for more information about Waypoints.

When you’re done, click Save. Then, you can exit out of the record and back to the editor’s main page by clicking the X above the Style tab. You can return to Omeka by clicking “Return to Omeka.”

7. Adding Waypoints: a table of contents for your map. The following guide from Neatline.org explains how to add a list of clickable records to your map, so viewers can jump from point to point without searching the map for them:
http://docs.neatline.org/working-with-the-waypoints-plugin.html
Linking your maps to your Omeka home page

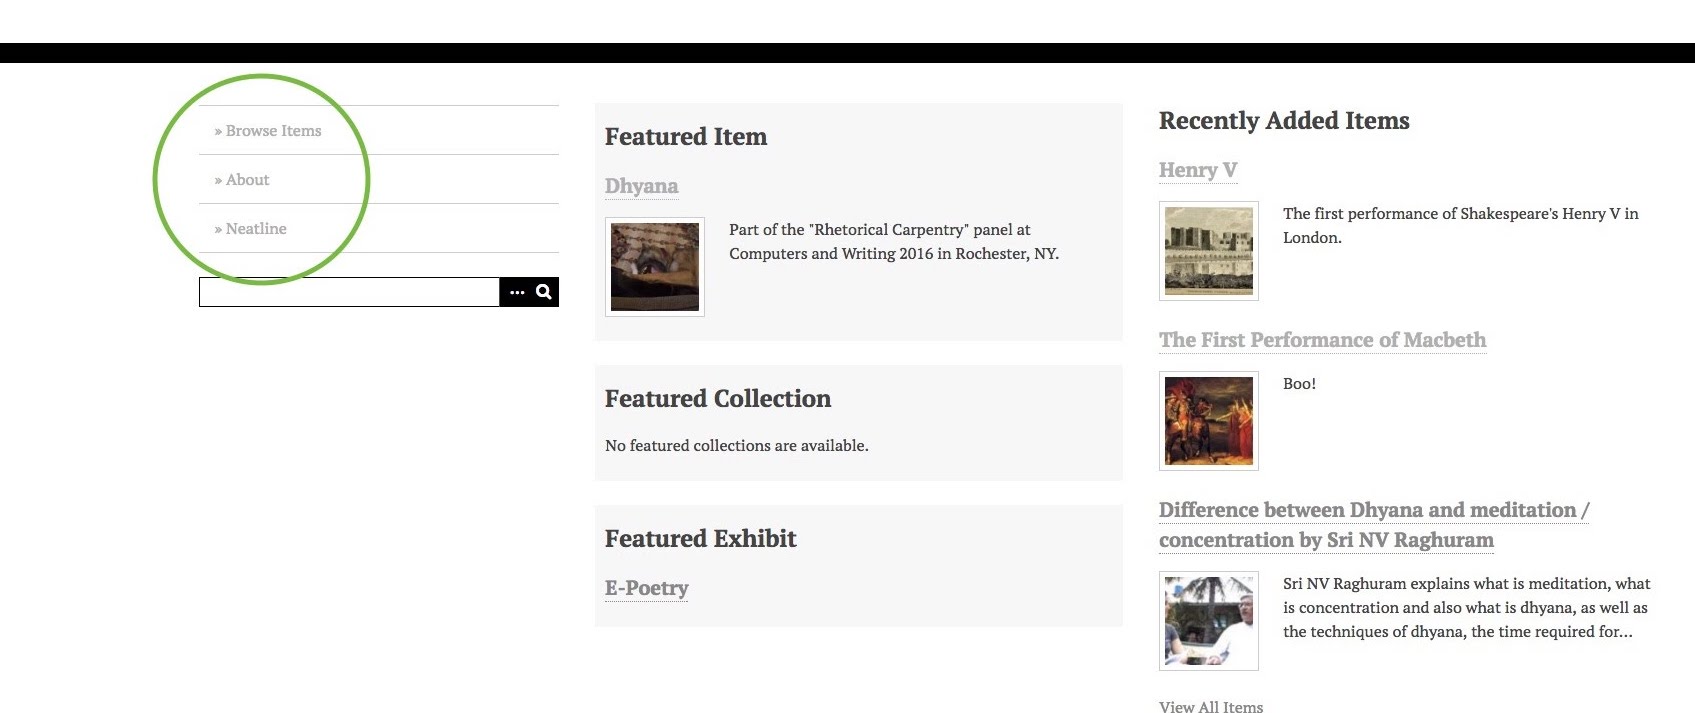
1. Choose what links you’d like to display on your home page’s navigation menu. This menu may appear in a slightly different place on your homepage depending on your theme. Here’s what it looks like in one of Omeka’s built-in themes (“Thanks, Roy”):
To edit this menu: from your Omeka dashboard, click Appearance in the black bar at the top of the screen. Then click the Navigation tab.
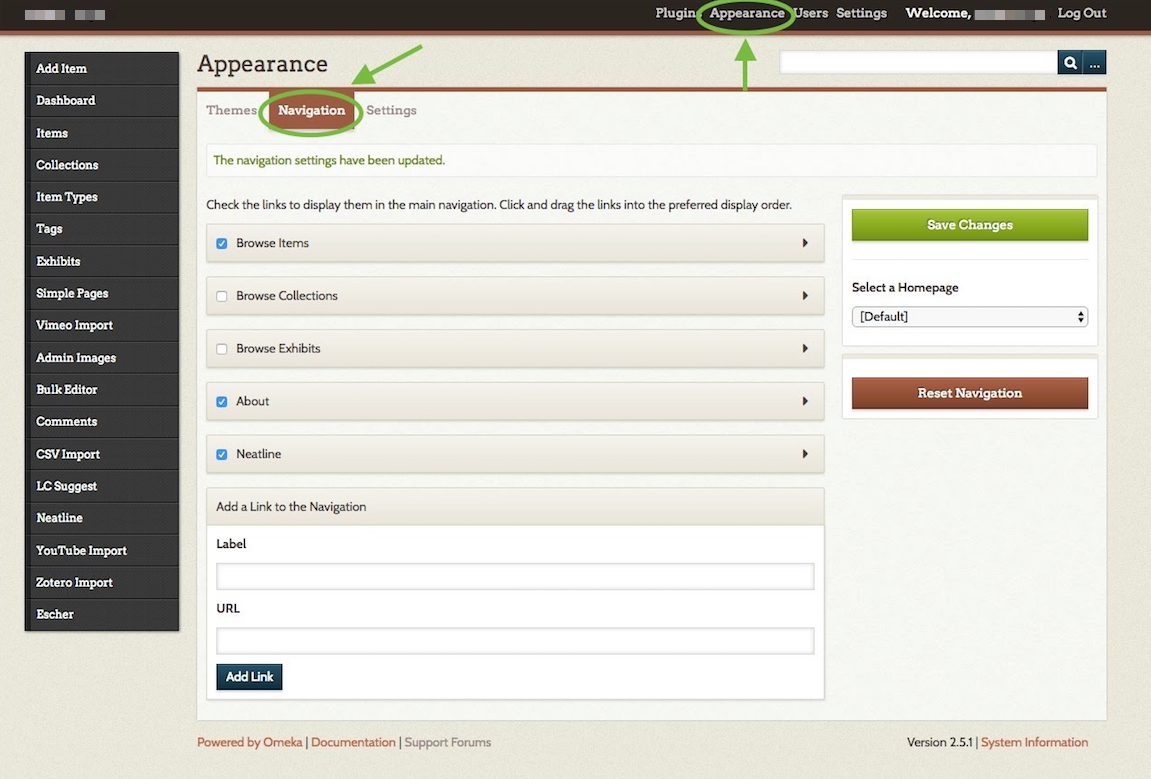
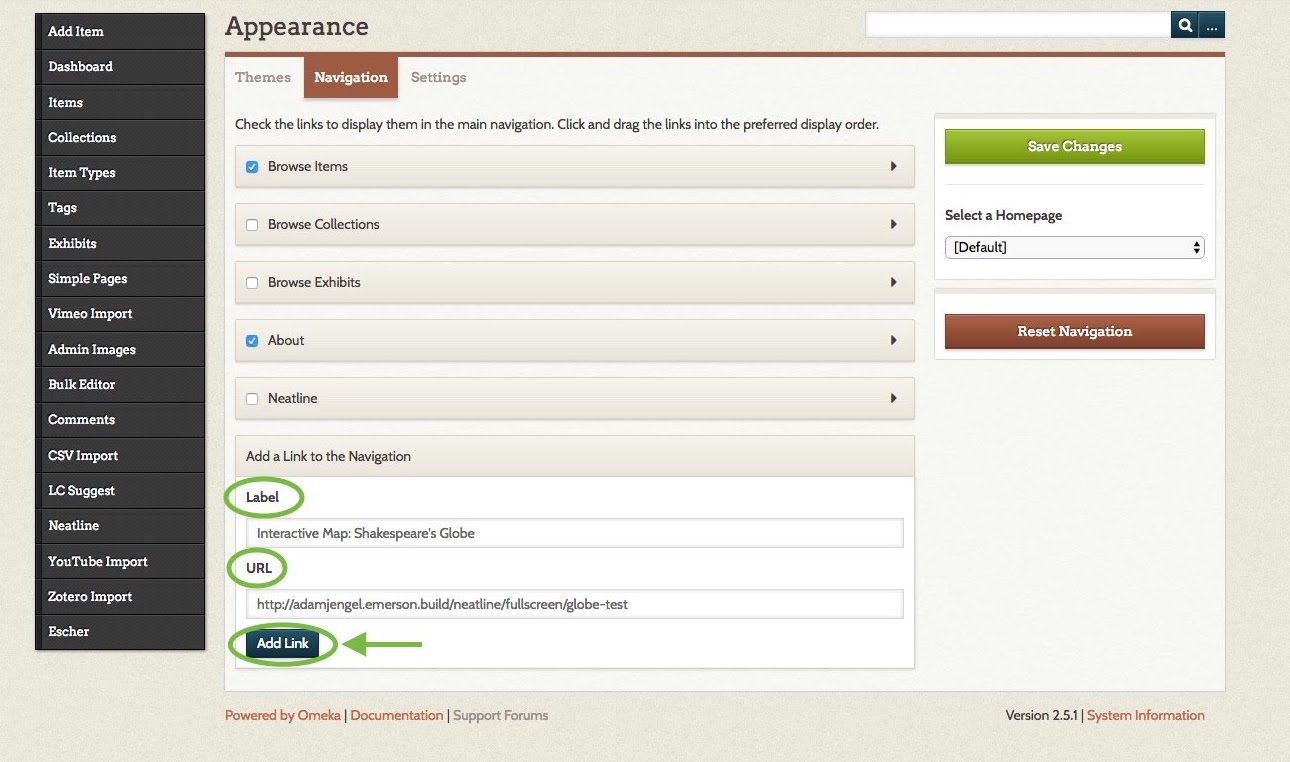
This takes you to a checklist of links. Each checked link will appear on your home page’s menu. To edit a link’s label (name) or URL, click the small black arrow to its right.

To add a new link: fill in the Label and URL fields at the bottom of this page, and then click Add Link. You can reorder the menu by clicking and dragging the links. When you’re done, click the green Save Changes button.
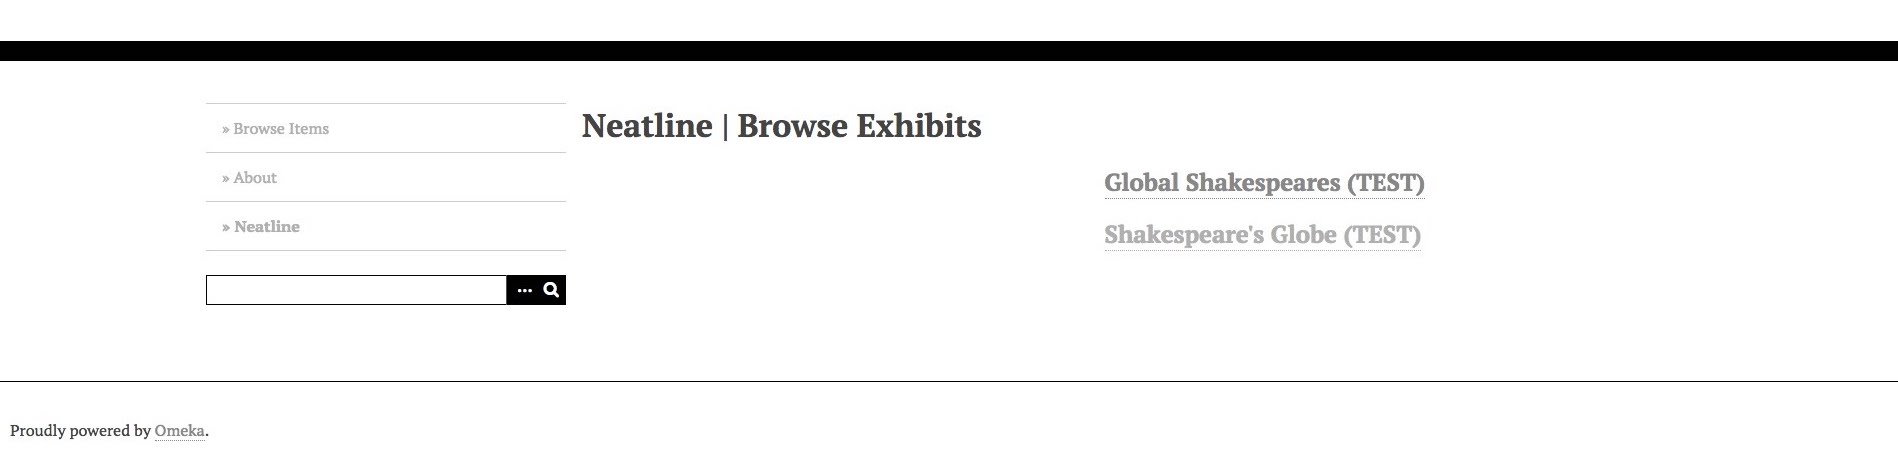
By default, there will be a link called “Neatline” which takes your viewer to a list of your Neatline exhibits. This is called the Browse Exhibits page, and looks like this:
If you’d rather have links on your menu to one or more specific exhibits, first pull up that exhibit’s public or full-screen view (see the screenshot for step 2 under Managing Neatline exhibits and using the editor above). Copy the URL from the address bar at the top of your browser. Paste it into the URL field on Appearance > Navigation, give it a label, click Add Link, and then Save Changes.

2. OR, choose a different default home page.

To use a list of your Neatline exhibits as your home page:
On Appearance > Navigation, click on the drop-down menu under “Select a Homepage” (to the right of the link checklist). Select “Neatline” (or whatever you’ve renamed it). Click Save Changes to finish.
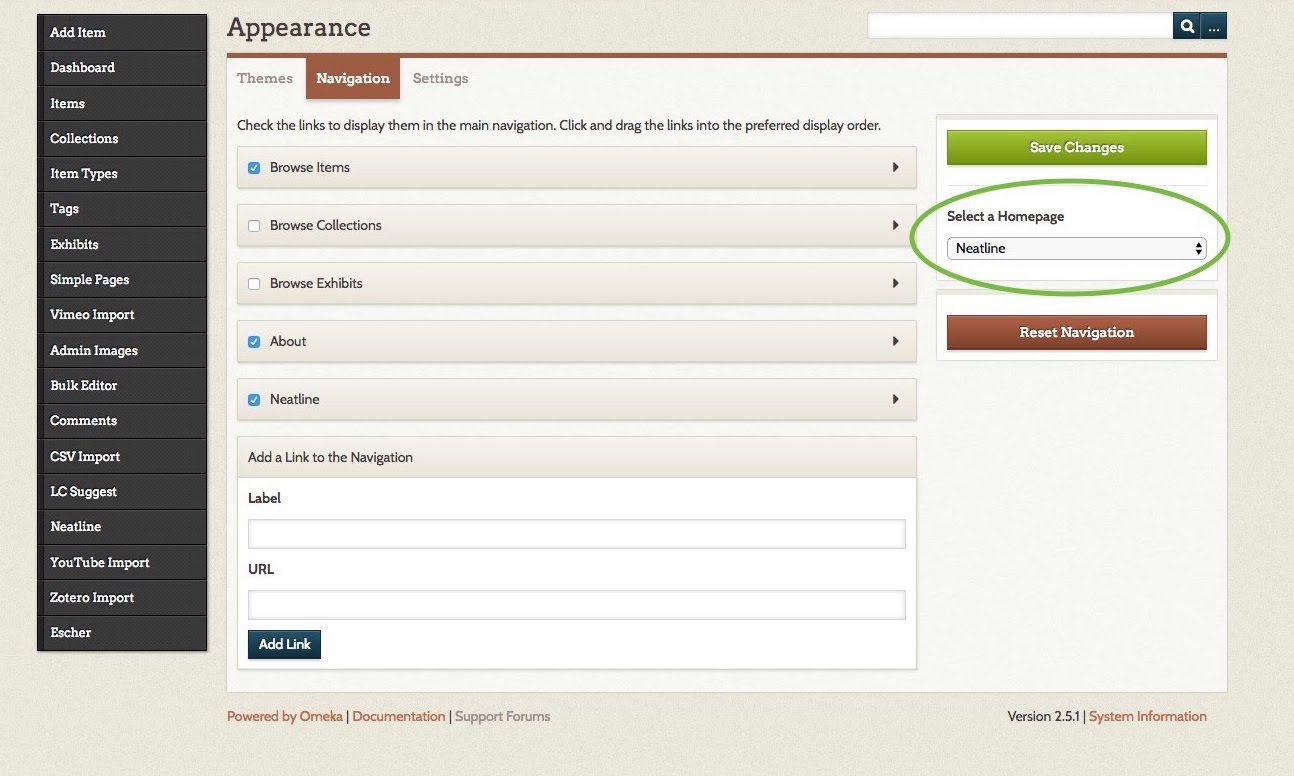
To use a specific exhibit as your home page (taking your viewer directly to the map):
On Appearance > Navigation, add a link to the public or fullscreen view of the map you wish to be the homepage (see the previous step). Then, click on the drop-down menu under “Select a Homepage” (to the right of the link checklist). Select the link you’ve just added. Click Save Changes to finish.
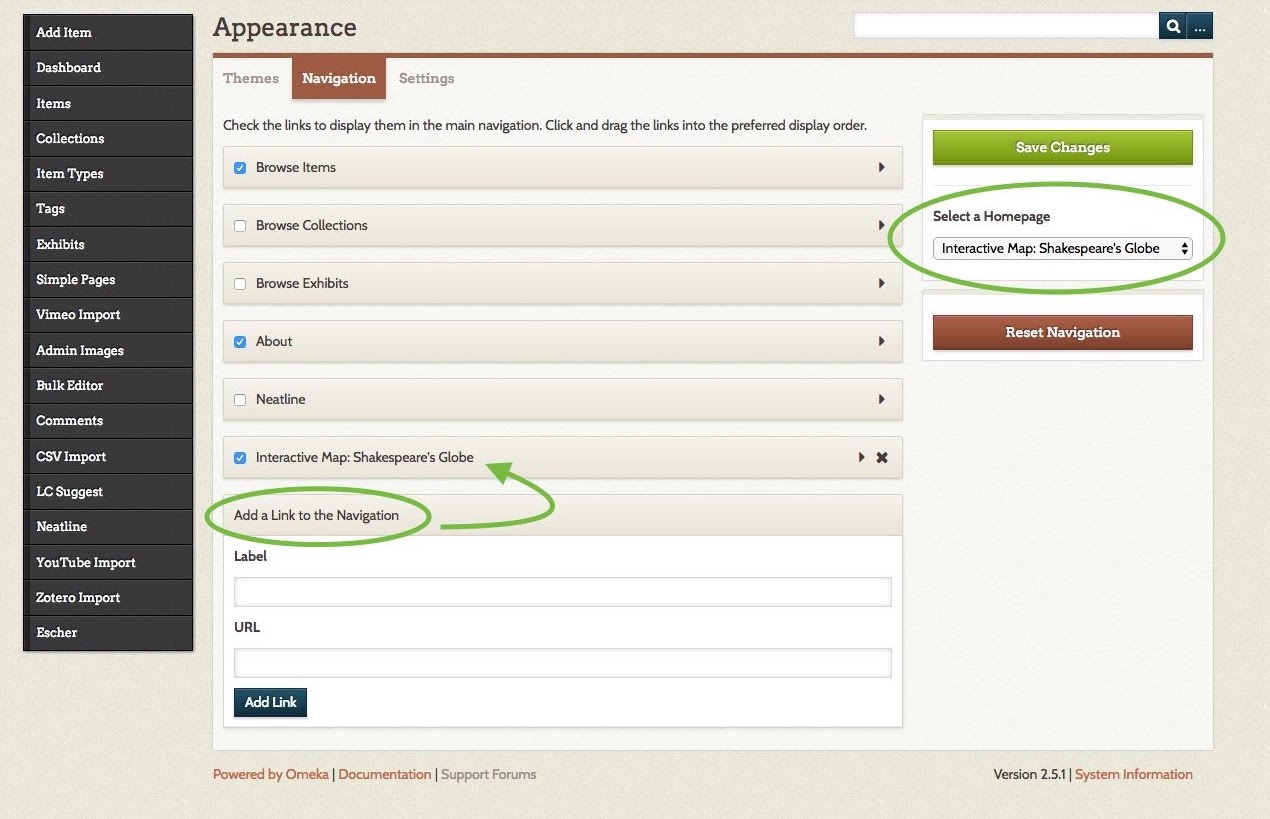
Now you can share your Omeka site’s address with whomever you’d like, and they’ll be able to explore your interactive map!
Discussion Settings

What makes WordPress a powerful platform is that not only can you create a dynamic website, but you can also allow dynamic discussions about the content with your visitors. Comments, the bread and butter of the discussion, can add to the overhead of your website management. You have to keep up with responses to your commenters or they will think you aren’t paying attention. Comments also can come, unfortunately, in the form of Spam. We will give you some additional information about dealing with Spam in another section. For now, here’s how to manage your Discussion Settings.

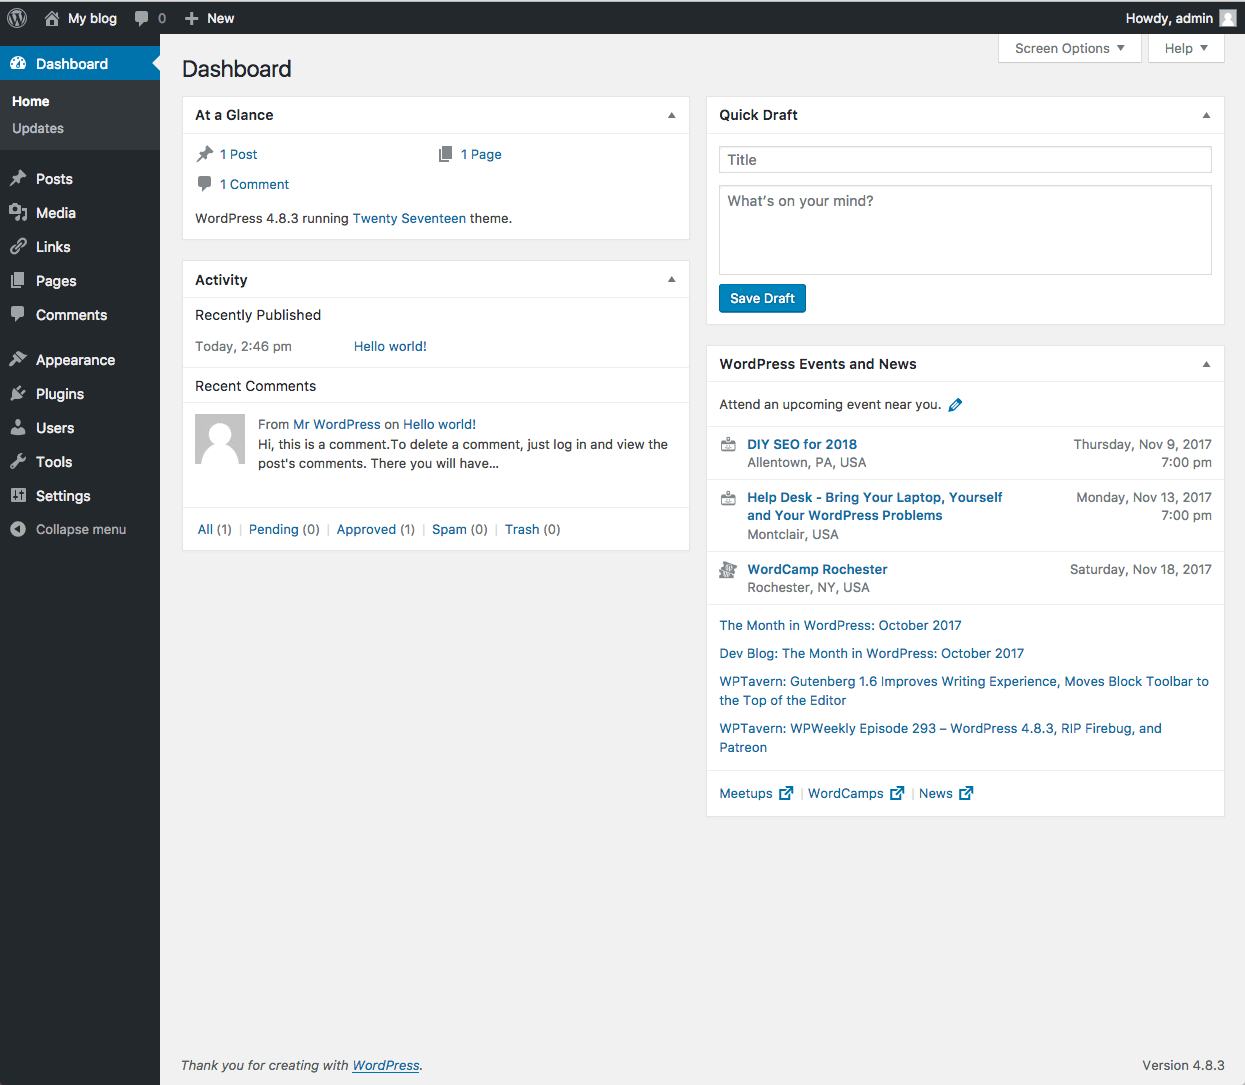
  1. Start at the Dashboard.Screen shot of WordPress Dashboard
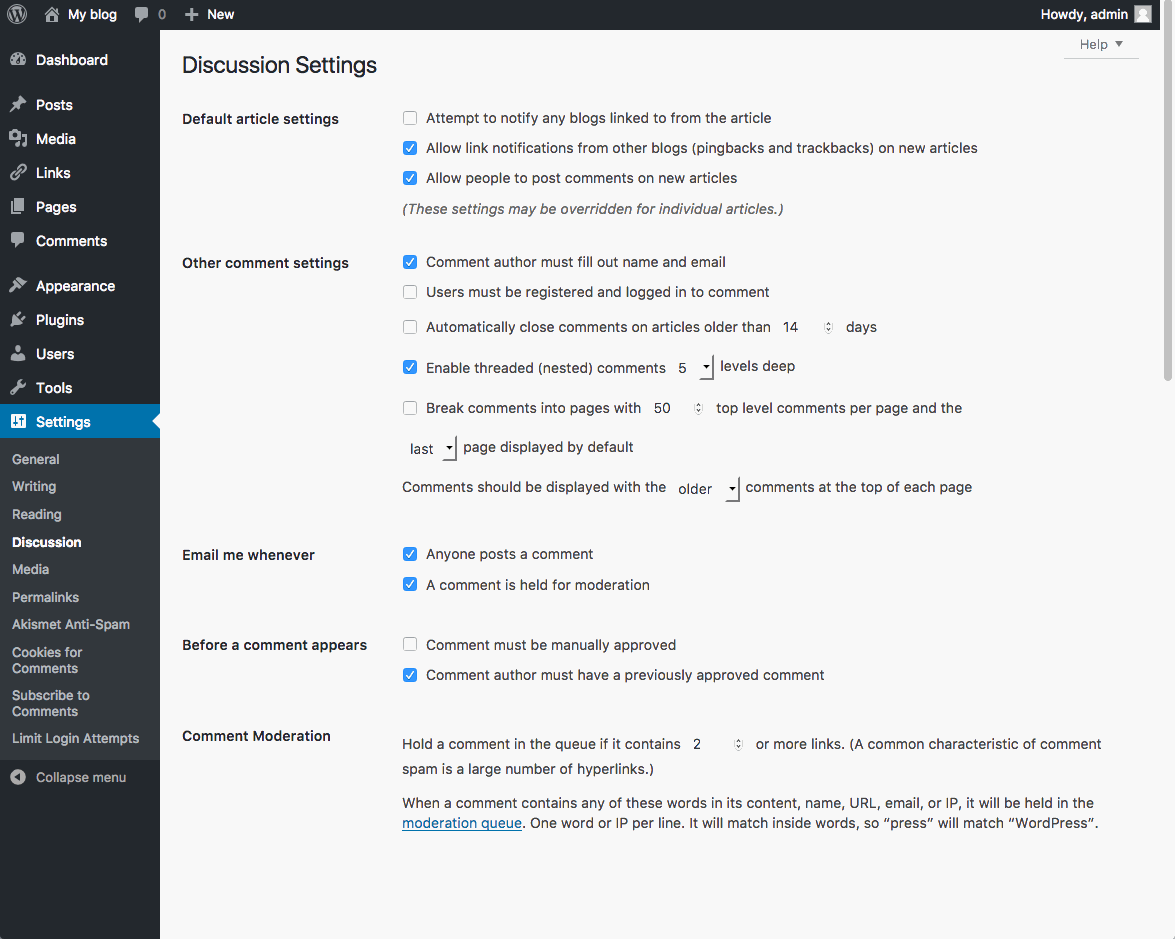
  2. Navigate to Settings > Discussion.screen shot of discussion settings, part 1
    • The two main forms of discussion on a website are “Allow link notifications from other blogs (pingbacks and trackbacks)” and “Allow people to post comments on new articles”.
    • Comments are self-explanatory. People come to your website, read an article, and as long as you allow comments, people can write whatever is on their mind. Commenters must leave their name and email address (if you leave that setting checked). You can also require users to be registered to your site to comment. They would then need to be logged in to submit any comments. By default, you will get an email sent to the admin account of the WordPress site when someone posts a comment, or when a comment is held in moderation. You can uncheck those boxes if you do not wish to receive those emails.
    • A comment will appear on the article (post or page) only after you approve it. If you have approved a comment author once, they will be automatically approved the next time they leave a comment on your site. If you uncheck the box labeled “Comment author must have a previously approved comment”, then all comments will appear automatically. We don’t recommend this setting.
    • You also have some control over comment moderation regarding how many links a comment contains (spammers like to put links in their “comments”). You also can filter out words, URLs, email addresses, to hold them in moderation. You can then approve them, spam them, or trash them.
    • There are also forms of discussion called link notifications. Spammers like these too. Here’s an article on the What, Why, and How-To’s of Trackbacks and Pingbacks in WordPress.
  3. Sometimes it’s nice to have visual representations of the people who are commenting on your blog. These are called Avatars and can be found under Settings > Discussion.screen shot of discussion settings, part 2

WordPress uses a common universal system of avatars called Gravatars (Globally Recognized Avatars). The system requires you to sign up with your email address. You can upload a graphical representation of yourself (a picture or other graphic). From then on you are identified with your Gravatar on any blog that you use that email address with.

In the WordPress Discussion Settings, you have a few options. Whether to show Avatars at all, the “rating” allowed to be shown, and what the default Avatar will be if a user does not have a Gravatar.

Site Privacy

WordPress is a platform intended to allow you to share your thoughts and ideas freely and easily with the world. However, there are options to publish to a more limited audience.

The first way is to limit who can find your website. That is done by keeping search engines, like Google, from seeing (known as indexing) your site.

  1. To do this, we’ll start at the Dashboard.Screen shot of WordPress Dashboard
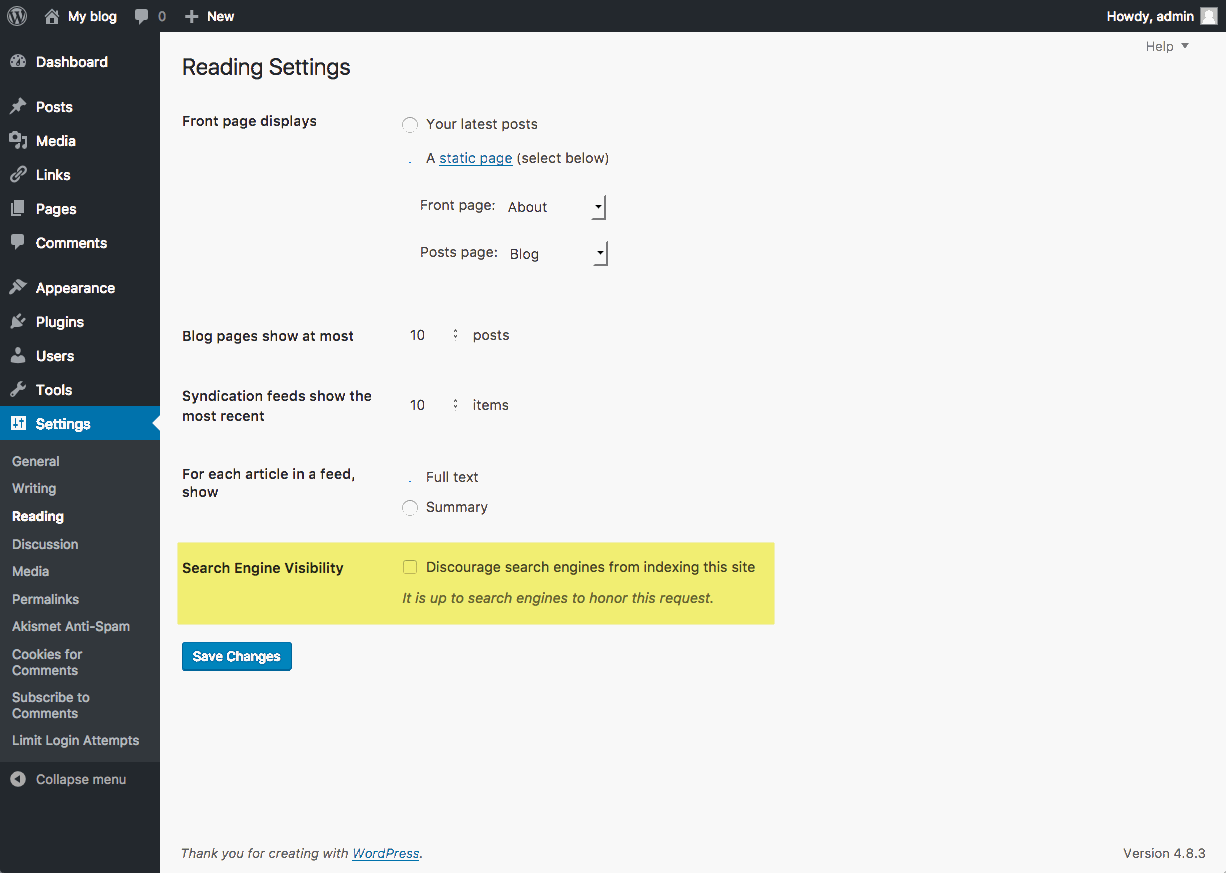
  2. Navigate to Settings > Reading. Normally the box next to Search Engine Visibility is unchecked. If you decide to check the box, it will “Discourage search engines from indexing this site.” It will depend on the search engine to honor your “request”. Some search engines will simply ignore it. Obviously, this is not a sure-fire way of keeping your blog private.reading menu--search engine setting
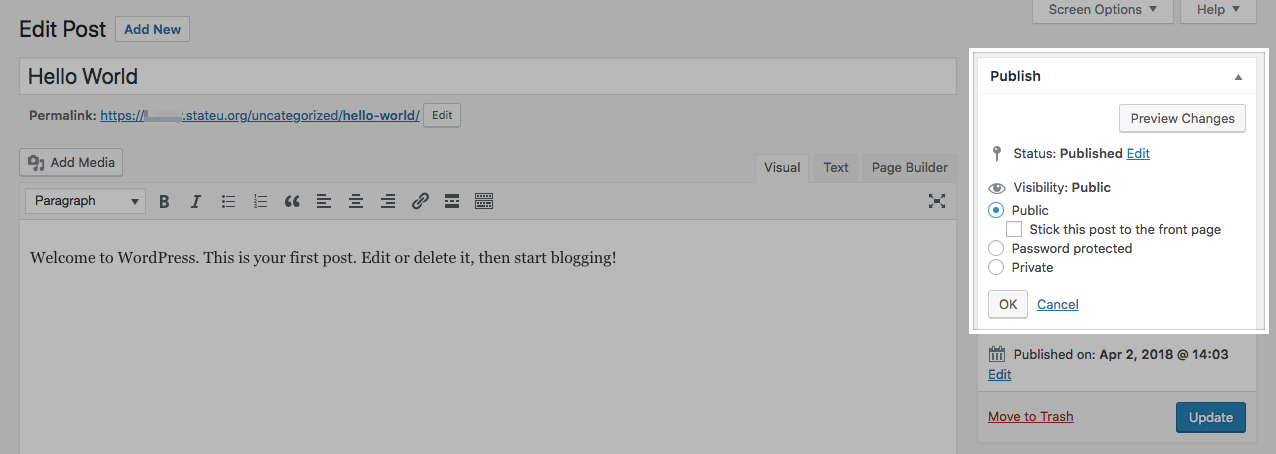
  3. You also have options on individual posts to keep them private, so that only people who are logged in to your site can view a given post. You can also password protect posts with a password you supply. Choose the Private radio button to keep a post hidden behind the login, or choose the Password protected button and then type in the password you wish to use. Click on OK when you are finished. Then be sure you click the Update button to save your post with the new settings.

Managing Spam: Akismet

SPAM! Everyone hates it in their email. If you’re new to WordPress and blogging platforms, spam exists in the form of comment spam – people (or vermin) leave comments promoting their services or schemes, on a post or page.

So how do you deal with comment spam when it can come in even more often than email spam? Do you have to delete every comment that comes in? Well, the answer to the second question is “no”, and the answer to the first question is, with a plugin called Akismet.

  1. To get started we need to install a plugin. To do this, we’ll start at the Dashboard.Screen shot of WordPress Dashboard
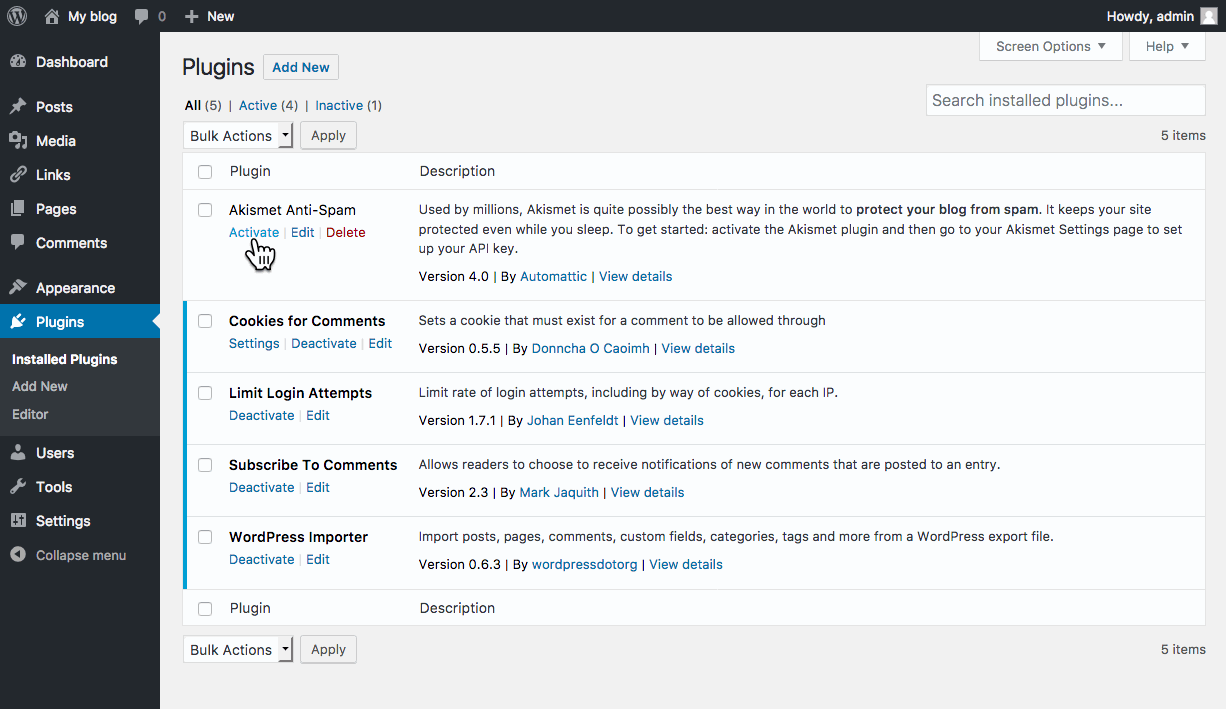
  2. Navigate to Plugins > Installed Plugins.Screen shot of Akismet on plugins menu
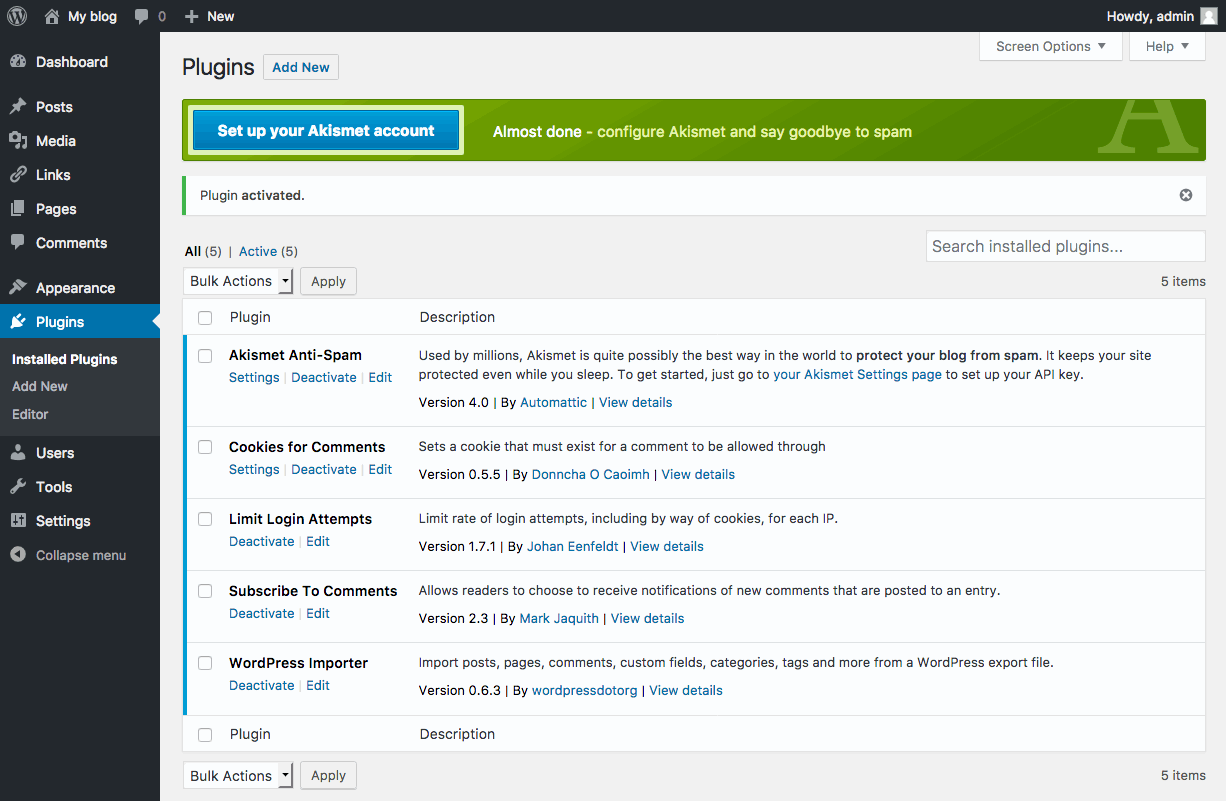
  3. At or near the top of the list of plugins that are automatically installed in a new WordPress installation, is Akismet. It is not activated, so part of the process of getting Akismet is Activating the plugin. Before you activate it, however, you need to get something that will be somewhat strange for most people. It’s called an API key. API stands for Application Programming Interface, and it’s a way for programs and services to “talk” to each other. The Akismet plugin requires you to get an Akismet API Key, which is simply a “code” that you supply when activating the plugin. The key is free if you use it on a personal WordPress installation, and it’s available on the Akismet website.screen shot after activating Akismet
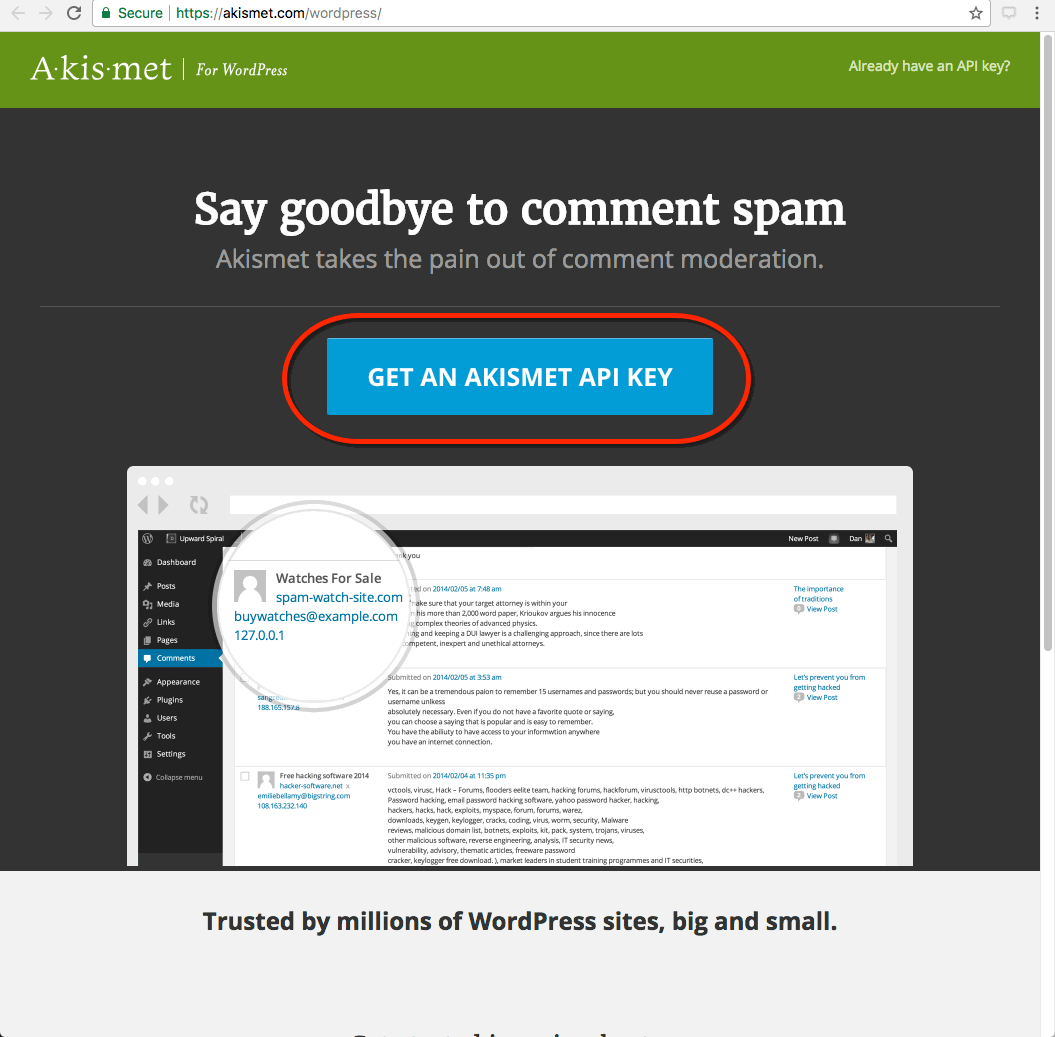
  4. Once you arrive on the Akismet for WordPress site, click the Get an Akismet API key button.Screen shot of Akismet web site where you get key
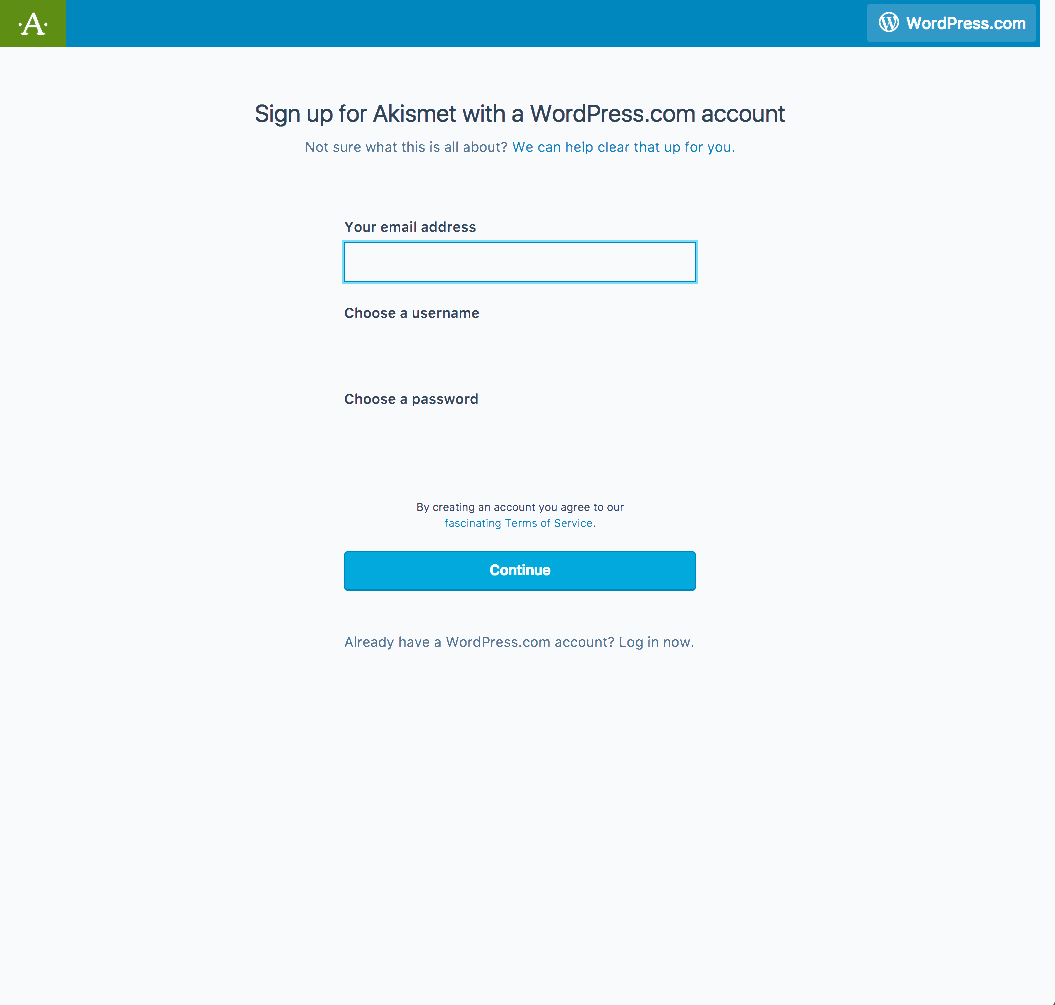
  5. If you have an account at WordPress.com you can sign in with that login and get your key. Otherwise, fill in an email address, a username, and a password to use for a new account. Click the Sign up button to proceed.
    create a wordpress.com account, if you don't already have one
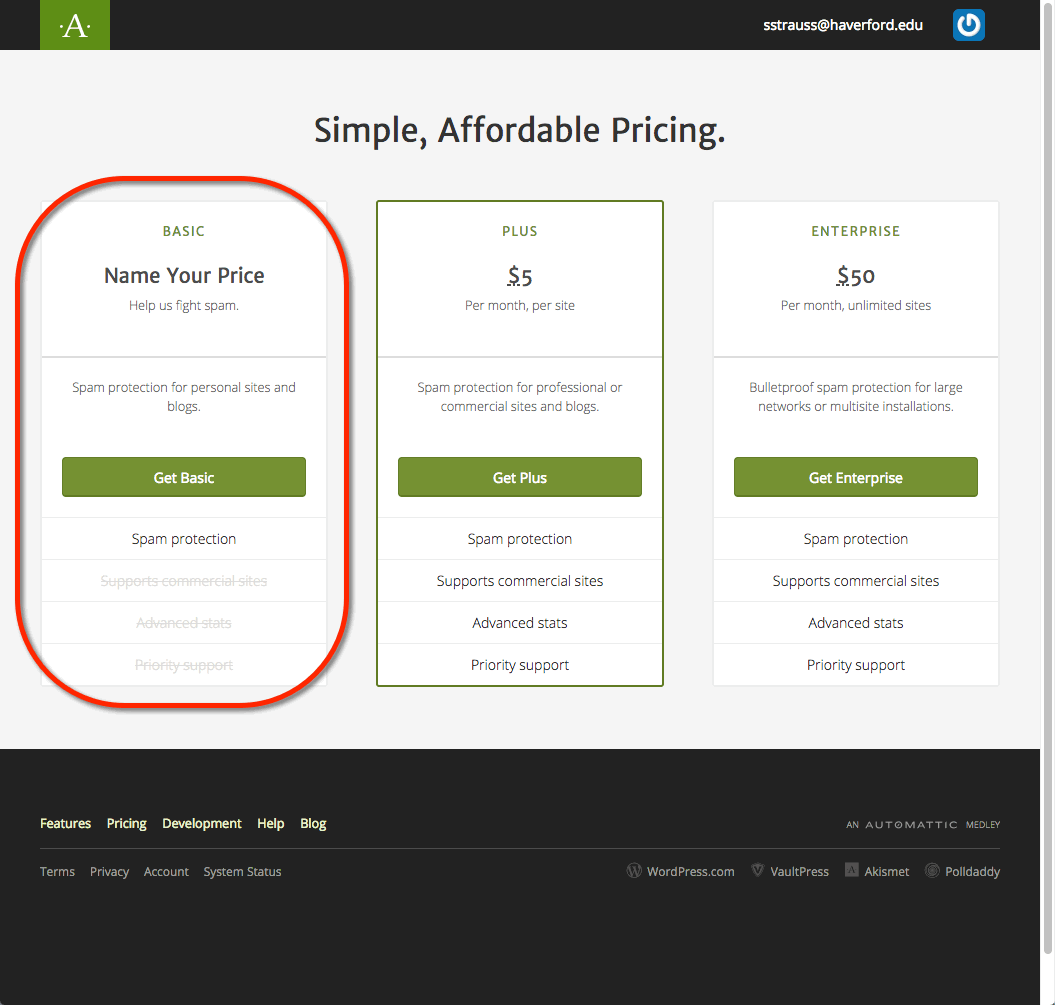
  6. Type in the URL of the site you’ll use Akismet on and click on the Sign Up button under the Personal plan (that is if you want it to be the free version).Select desired Akismet plan
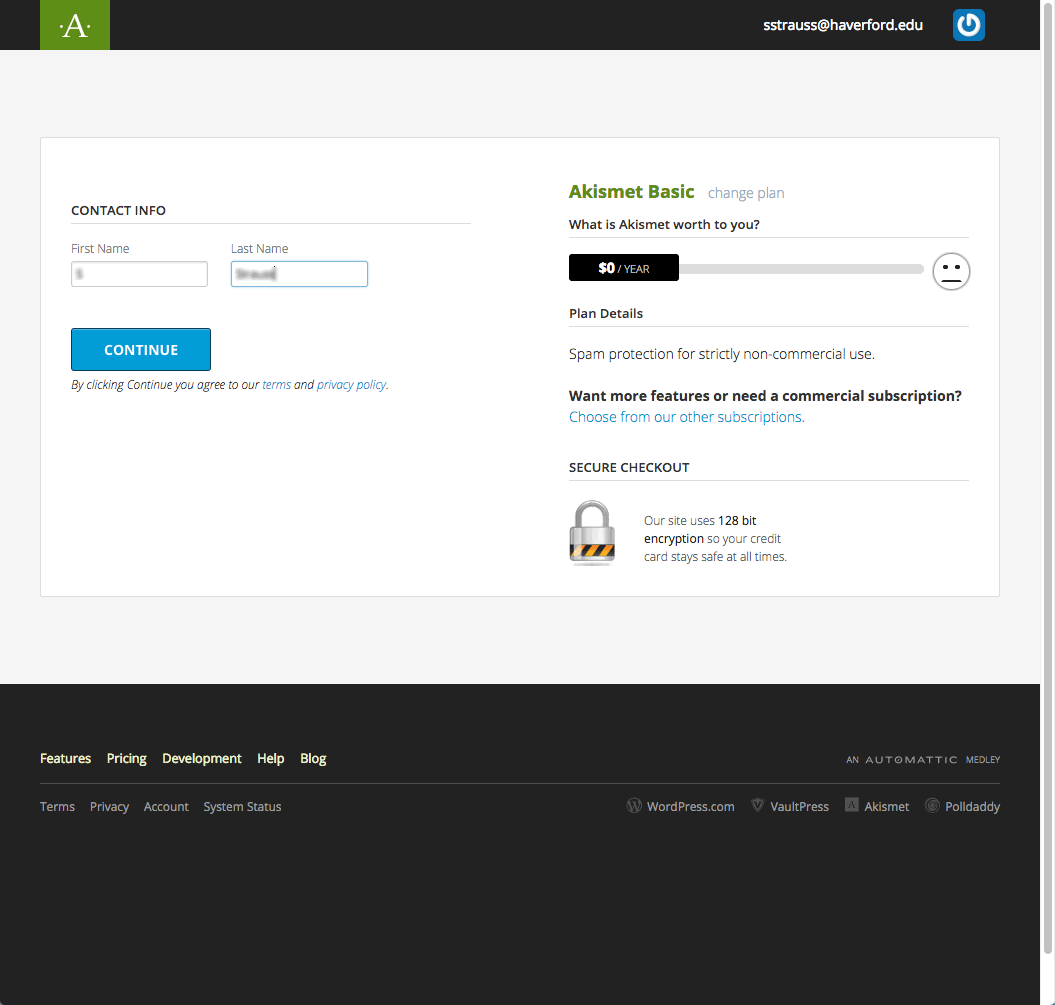
  7. When you get to the next page, the recommended contribution is $36. You can adjust the slider down to $0. The smiley face will begin to frown, but at least your key will be free. Lastly, fill in your name and click Continue.
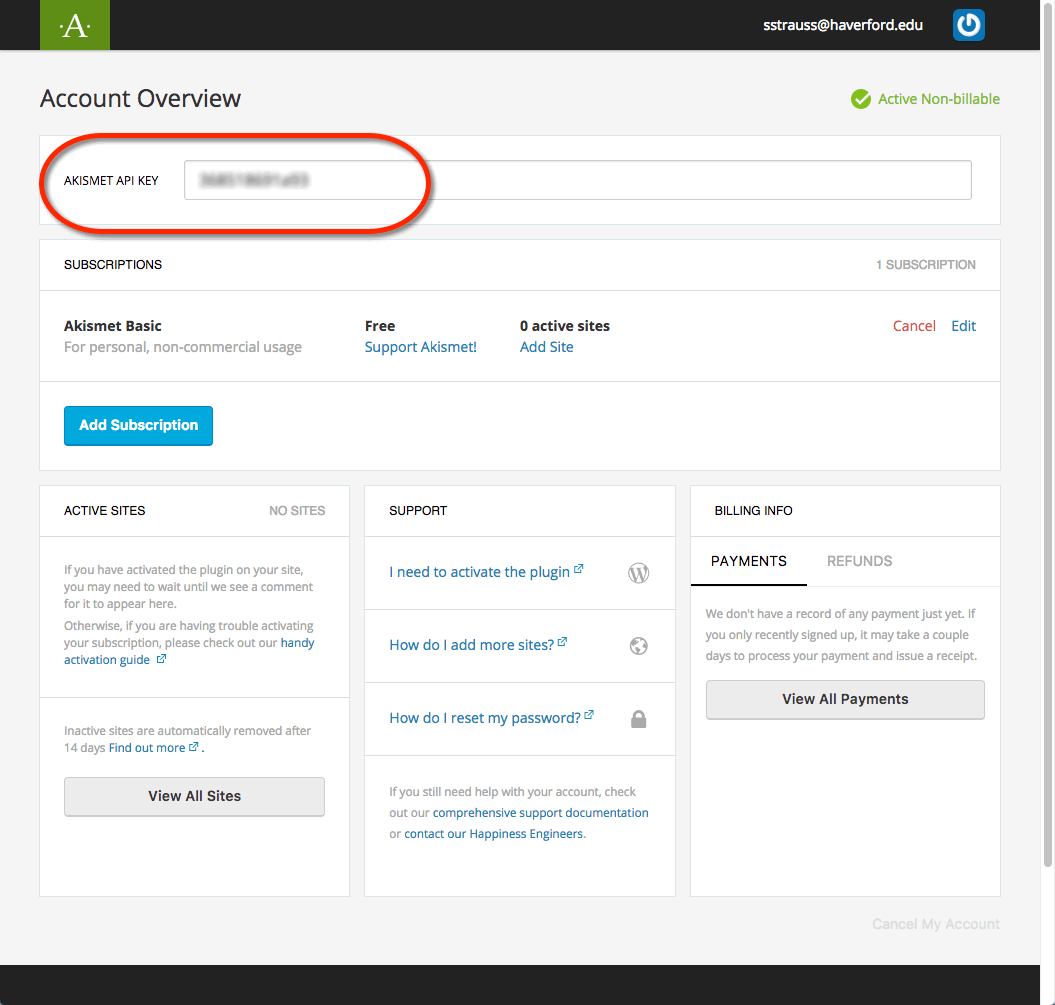
  8. You’re finished with the sign-up process for your key, and it will be displayed on the page for you (we’ve blurred ours out).Akismet key
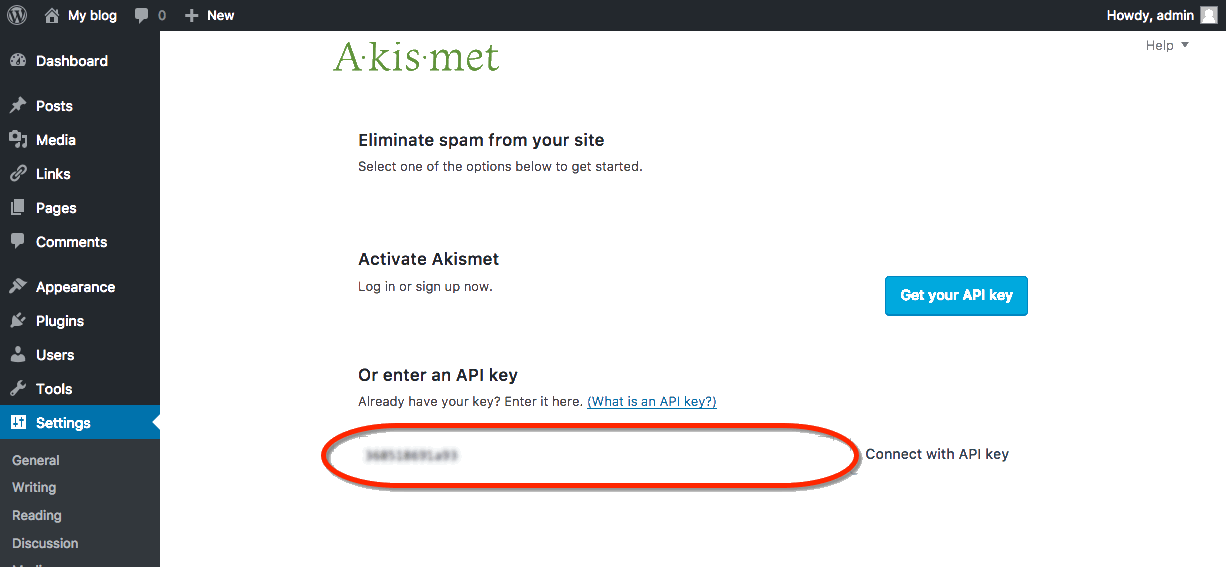
  9. Now follow the steps that they show you for using your new key. You will enter the key in either the Akismet area under Plugins or JetPack (if you have that installed).Akismet key

iOS & Android App

You can download the WordPress app from the iOS App Store or the Google Play Store for your mobile device.

Screenshot Setup Tutorial:

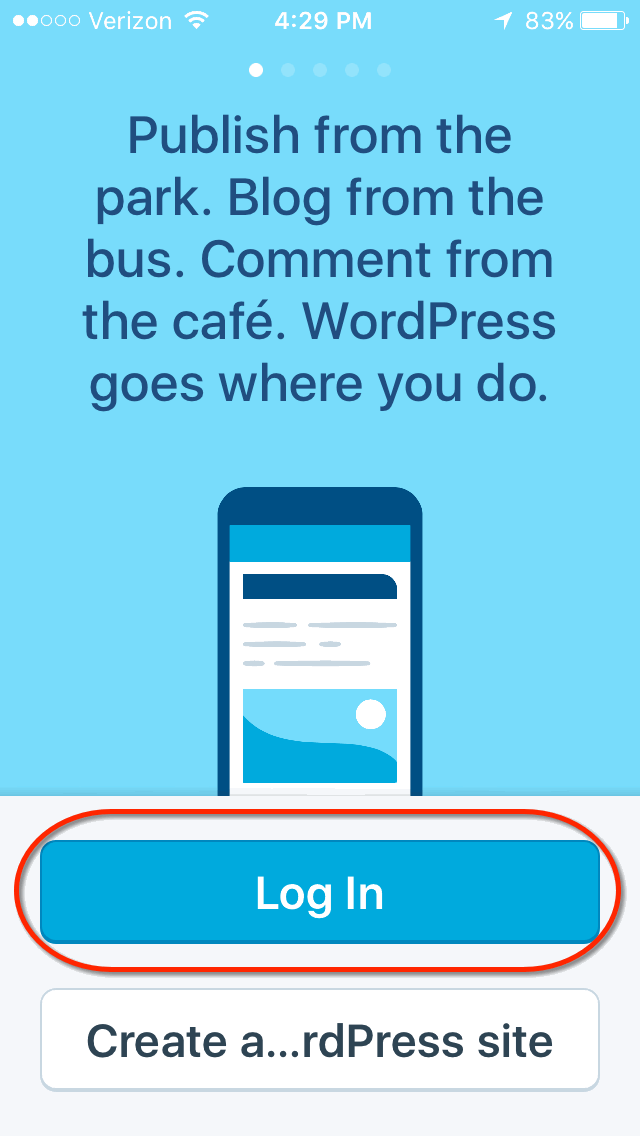
  1. When you open the WordPress app, tap on Add Self-Hosted Site:
    log into your WordPress site from your smartphone
  2. Then, you will be able to enter your WordPress site credentials:
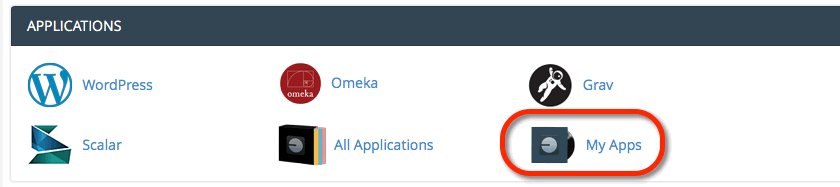
    These credentials come from your Installatron page of WordPress. To access these credentials, first find the applications you added with Installatron by clicking on the My Apps icon.My apps icon
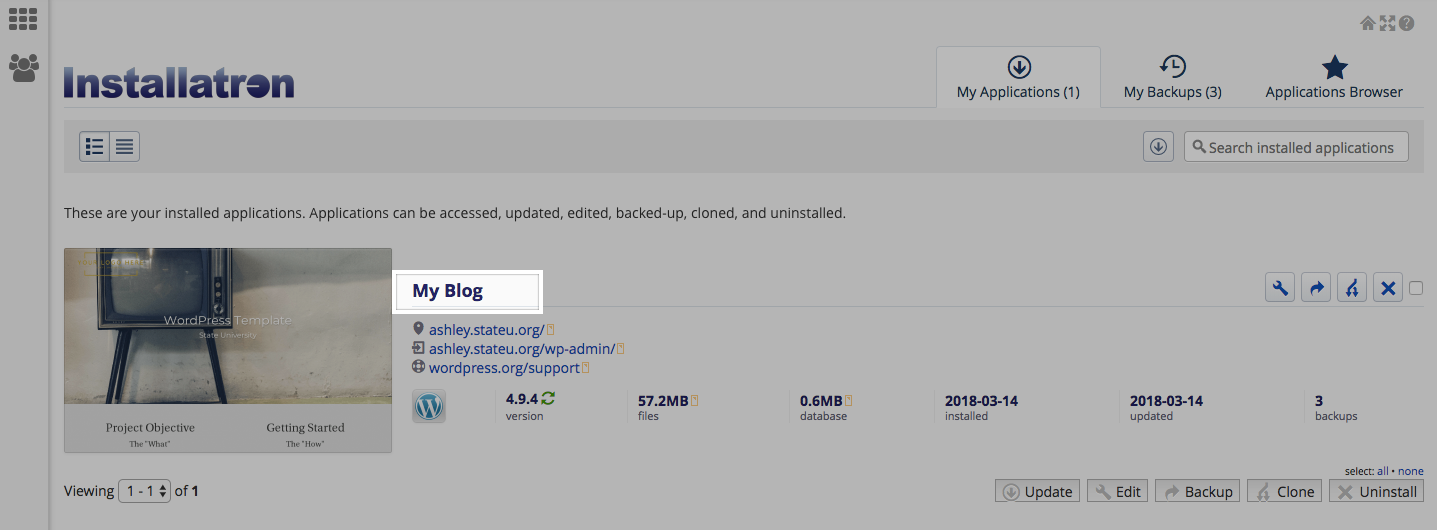
  3. Next, click the title of your installed instance of WordPress:
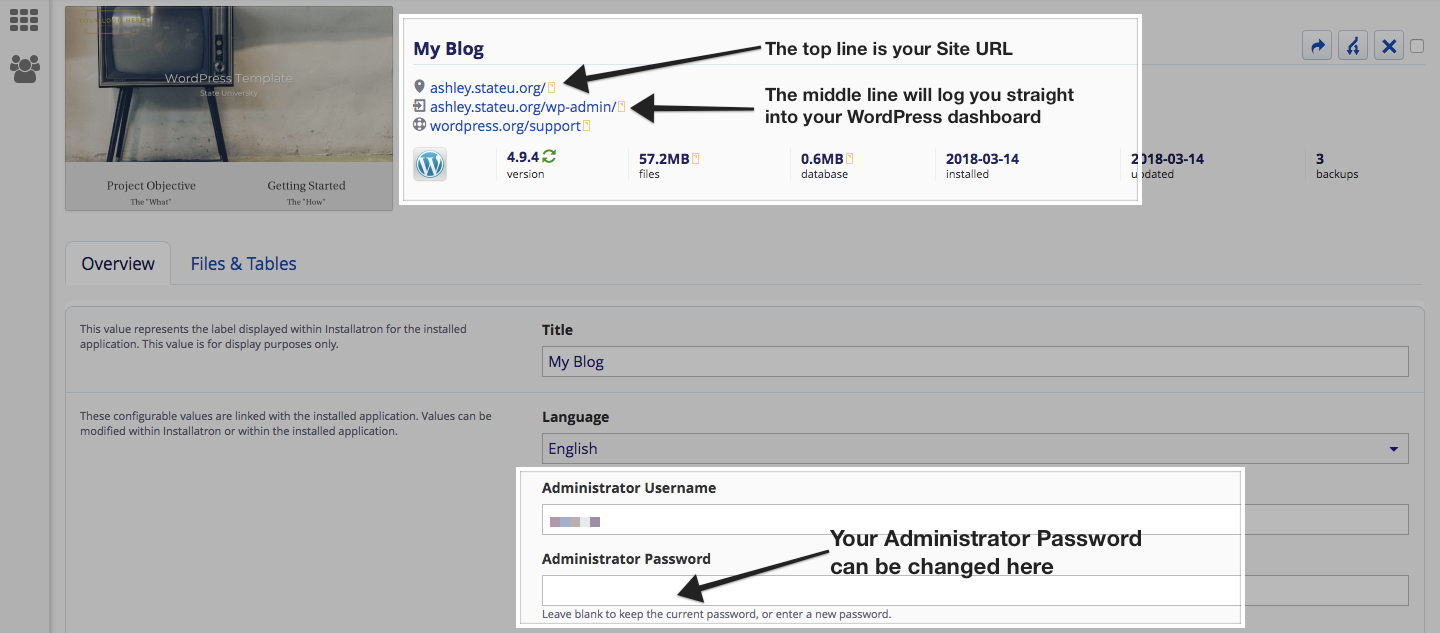
  4. From here, under the overview tab, you can access your WordPress site credentials. You may change your user password by filling in the field next to password, scrolling down, and clicking the Save all button. Note that this sometimes takes a few minutes, so even if it doesn’t look like anything is happening, do not refresh your page after clicking save.
  5. With these credentials, enter them into the WordPress App along with the url for your WordPress website and select Next.
  6. On the next page, you will see all of the WordPress websites you have added to the WordPress App. Continue to the site you just added.
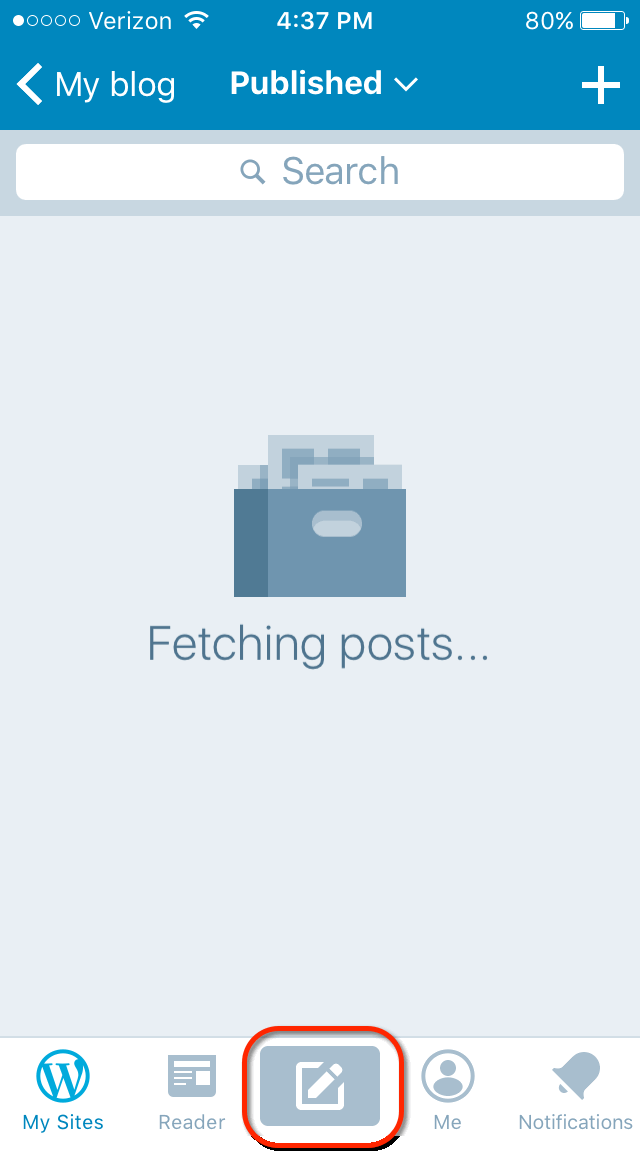
  7. To start a new post, tap on the Pencil Icon:
    pencil icon lets your create/edit blog post
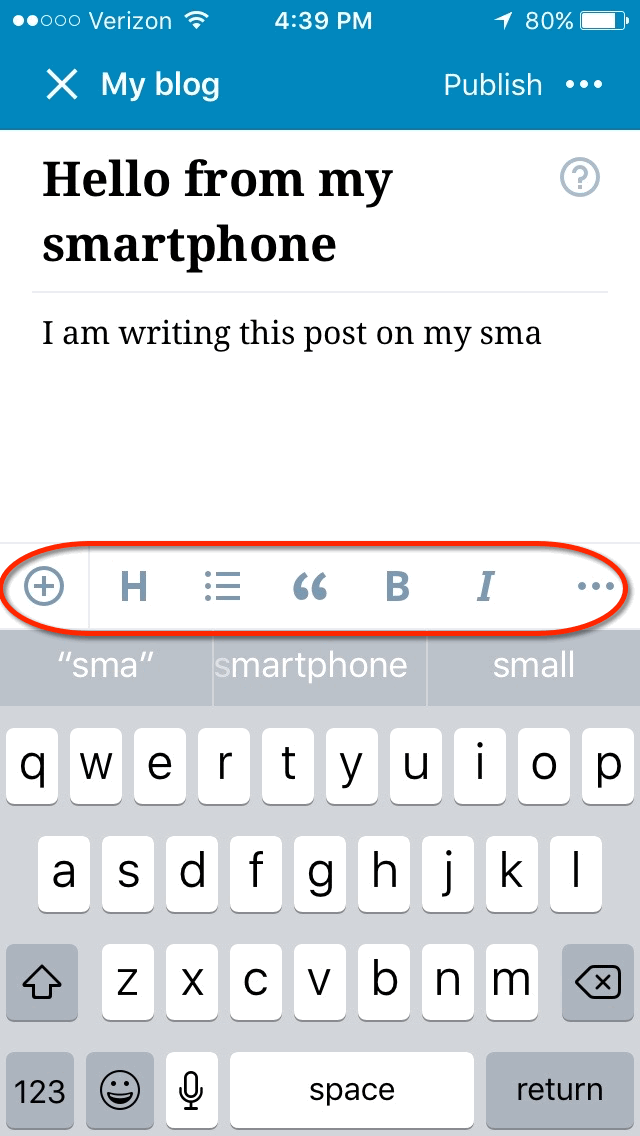
  8. On this page, add your Title and Content. You can edit the properties of text by selecting the text and the different Text Property Buttons:
    Screen shot of Text Property options
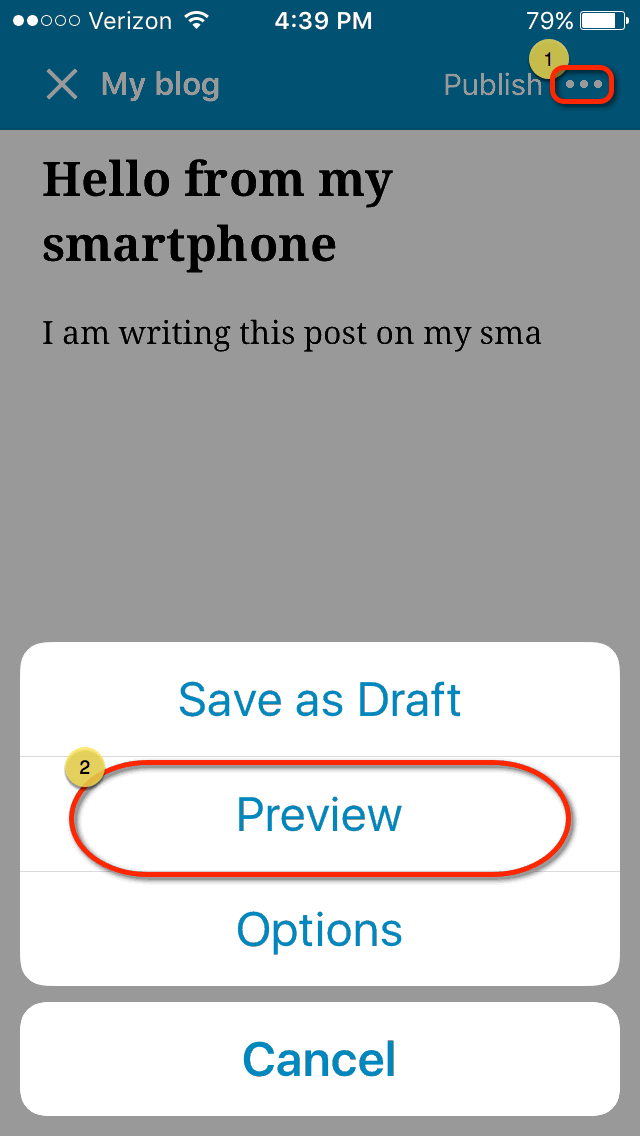
  9. To view the progress of your post, select “…” on the top right of the screen and select Preview:
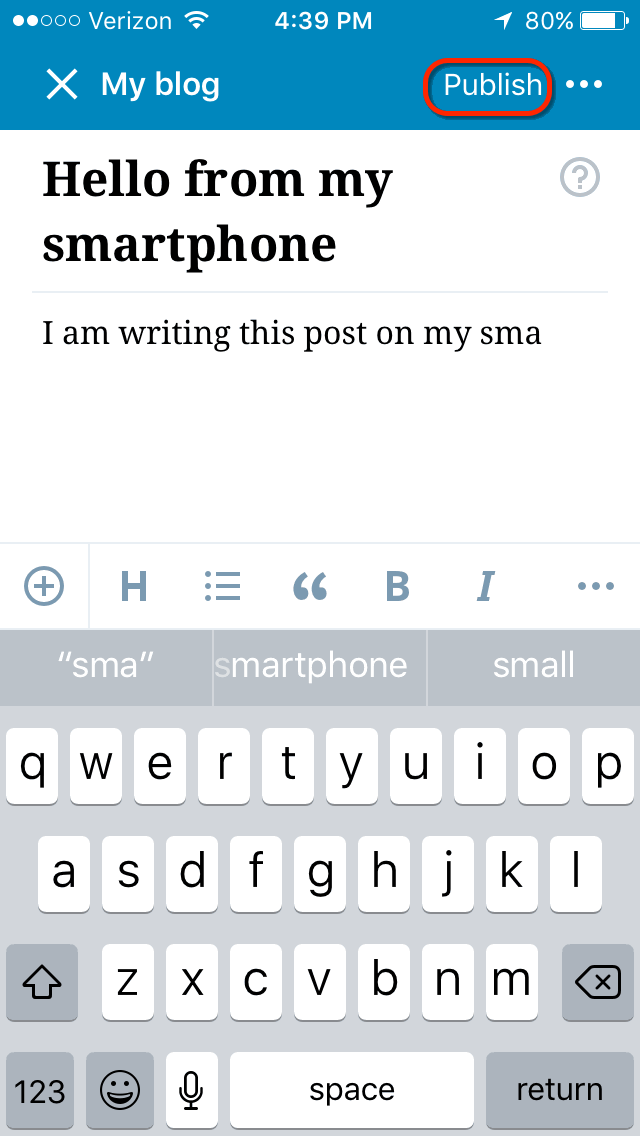
  10. When finished, select Publish:
    Publish post

Now when you visit your WordPress webpage, you will see your new blog post!

Installing Omeka

To get started you’ll need to login to your control panel (https://create.humboldt.edu/dashboard) using your Cal Poly Humboldt username and password.

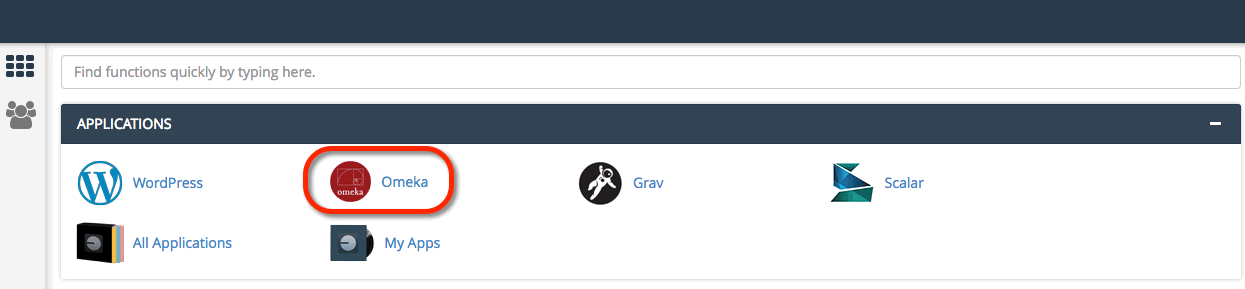
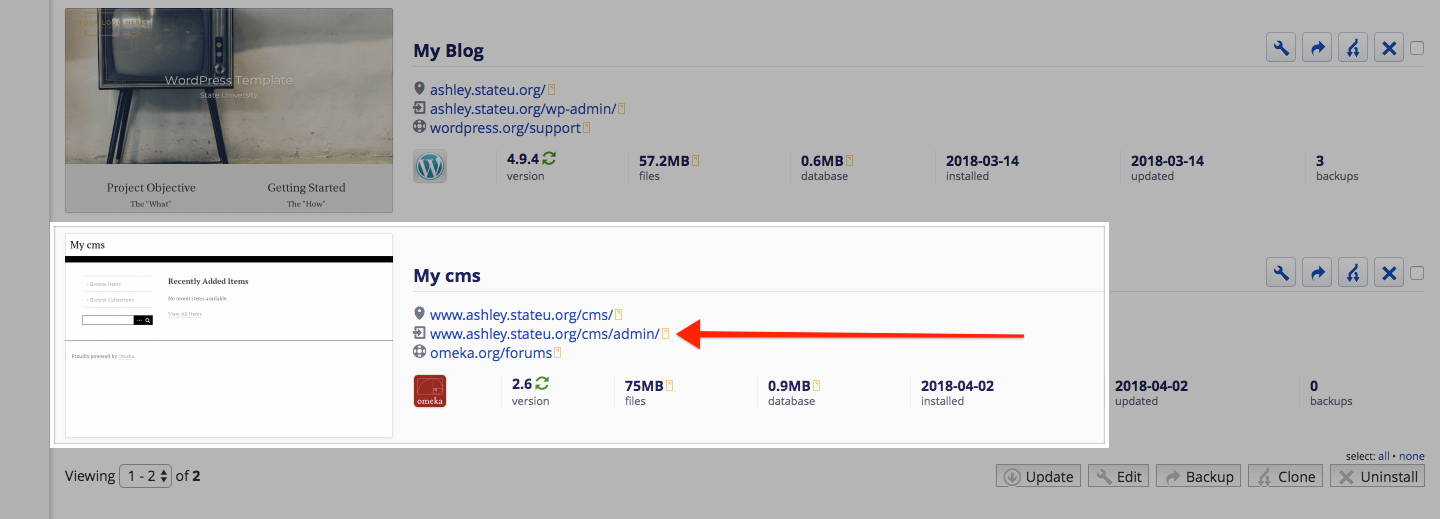
  1. Once logged in you’ll be on the homepage of your cPanel. Navigate to the Web Applications section of the cPanel and find Featured Applications. Then select Omeka.
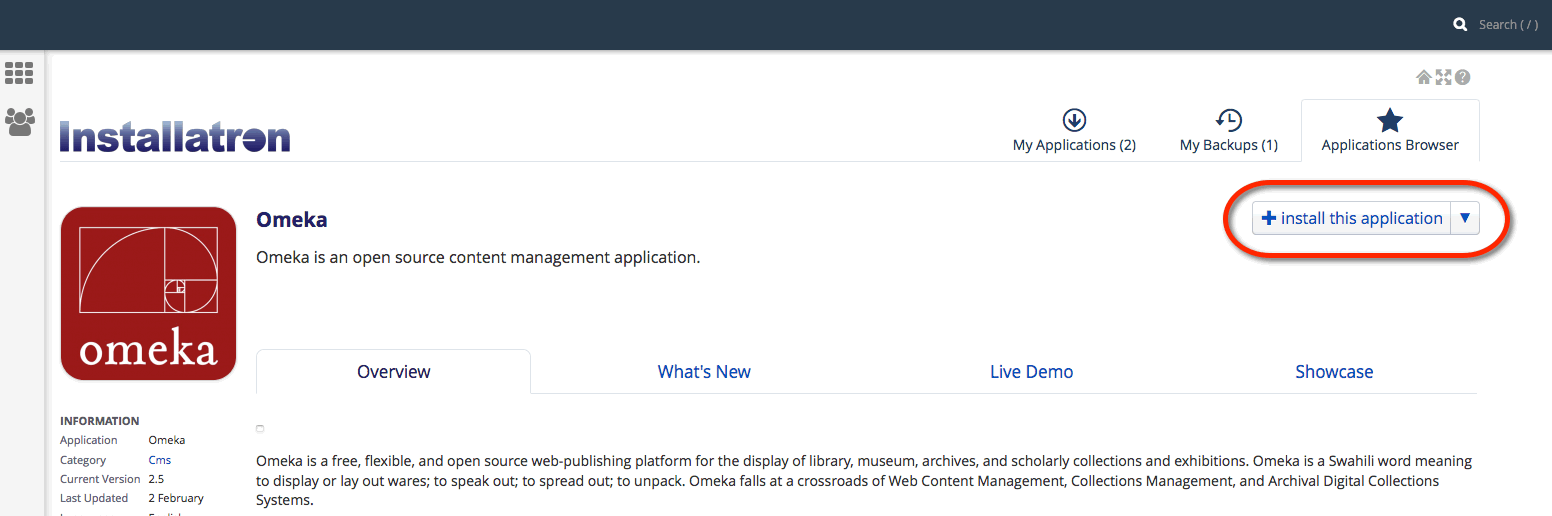
  2. This page gives you more information about the Omeka software. To begin the install, click install this application in the upper-righthand corner.
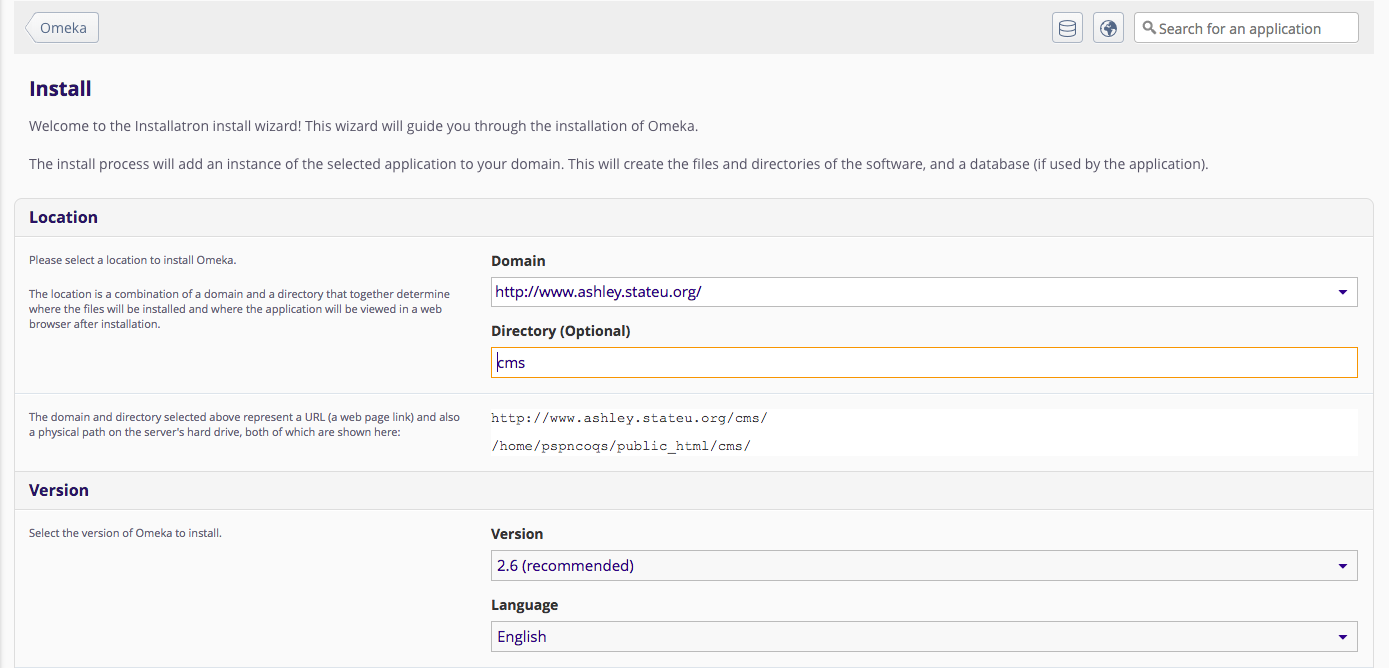
  3. On the next page, the installer will ask for some information about this install. The first thing you’ll want to do is decide where to install it. If you’re wanting to install Omeka on your main domain, you can leave the directory area empty. If you created a subdomain, you can select it from the drop-down menu. You also have the option of installing Omeka in a subfolder by typing in the folder name in the Directory field. Click here for more information about subdomains and subfolders.
  4. Scroll down to the next Setting section. Set an Administrator Username and Administrator Password. You will need this again shortly.
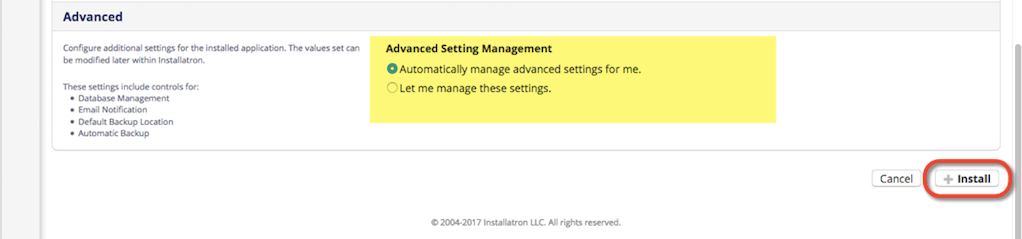
  5. By default the installer will automatically backup your website and update it anytime a new version comes out. While we recommend you keep this option, it is possible to only do minor updates, or turn them off completely. The installer will also create a database for you automatically, but if you’ve already created one for this website you can choose Let me manage the database settings and enter the details. Click Install to continue.
  6. The installer will take just a few moments to install Omeka and a progress bar will keep you updated. When it is complete you will see a link to your new Omeka site as well as a link to the backend administrative section for your Omeka site. Click the Omeka Admin link to configure your new Omeka installation.
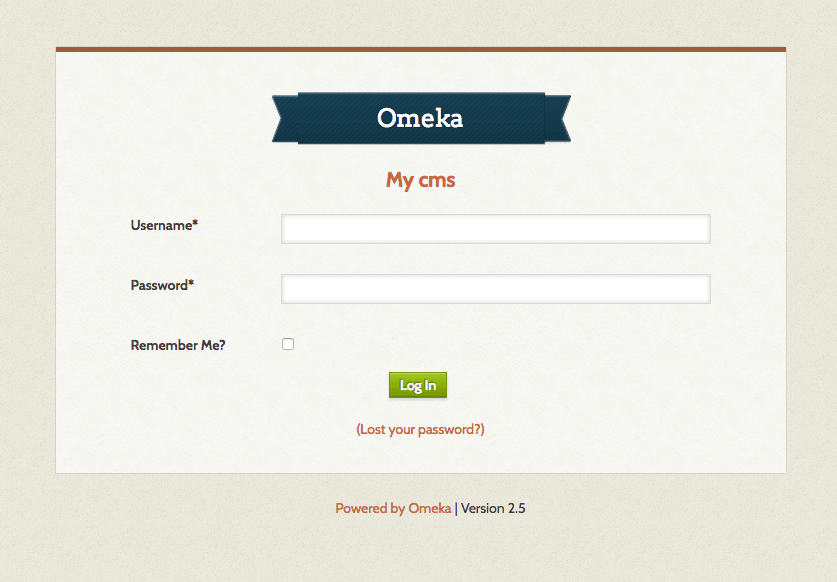
  7. When you visit your new Omeka Admin link, you are asked for the admin username and password. Enter the Username and Password that you set for the administrative superuser (i.e. yourself).
    Omeka login screen
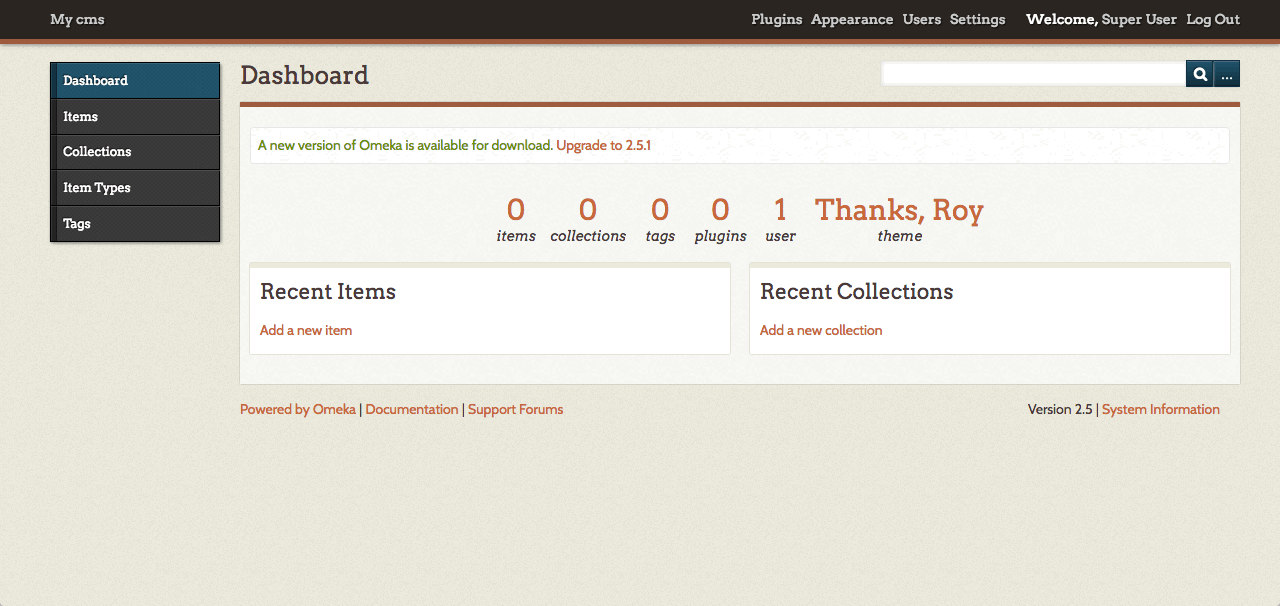
  8. Begin adding content in the Admin Dashboard. You’ll find lots of instructions, tips, and ideas on the Omeka.org documentation site.
    Omeka dashboard

Installing Plugins

As you begin to use your Omeka install on Reclaim Hosting you may wish to add additional functionality by way of the various open source plugins available at http://omeka.org/add-ons/plugins/. Although Omeka doesn’t currently include an automated installer for plugins, the process of uploading them to your space is outlined here.

To get started you’ll want to log into your cPanel:

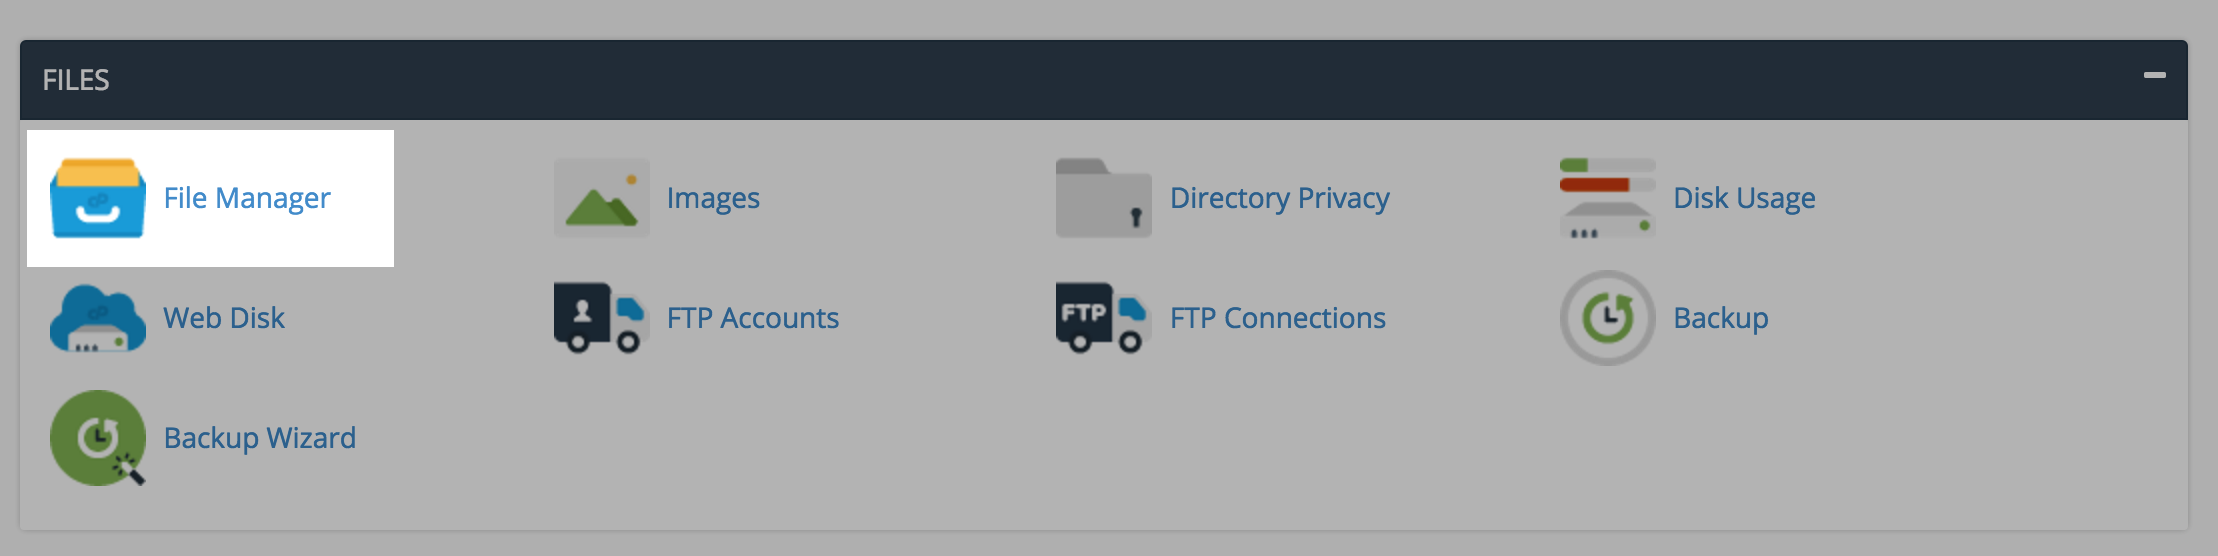
In cPanel you’ll access the File Manager located under the Files section.

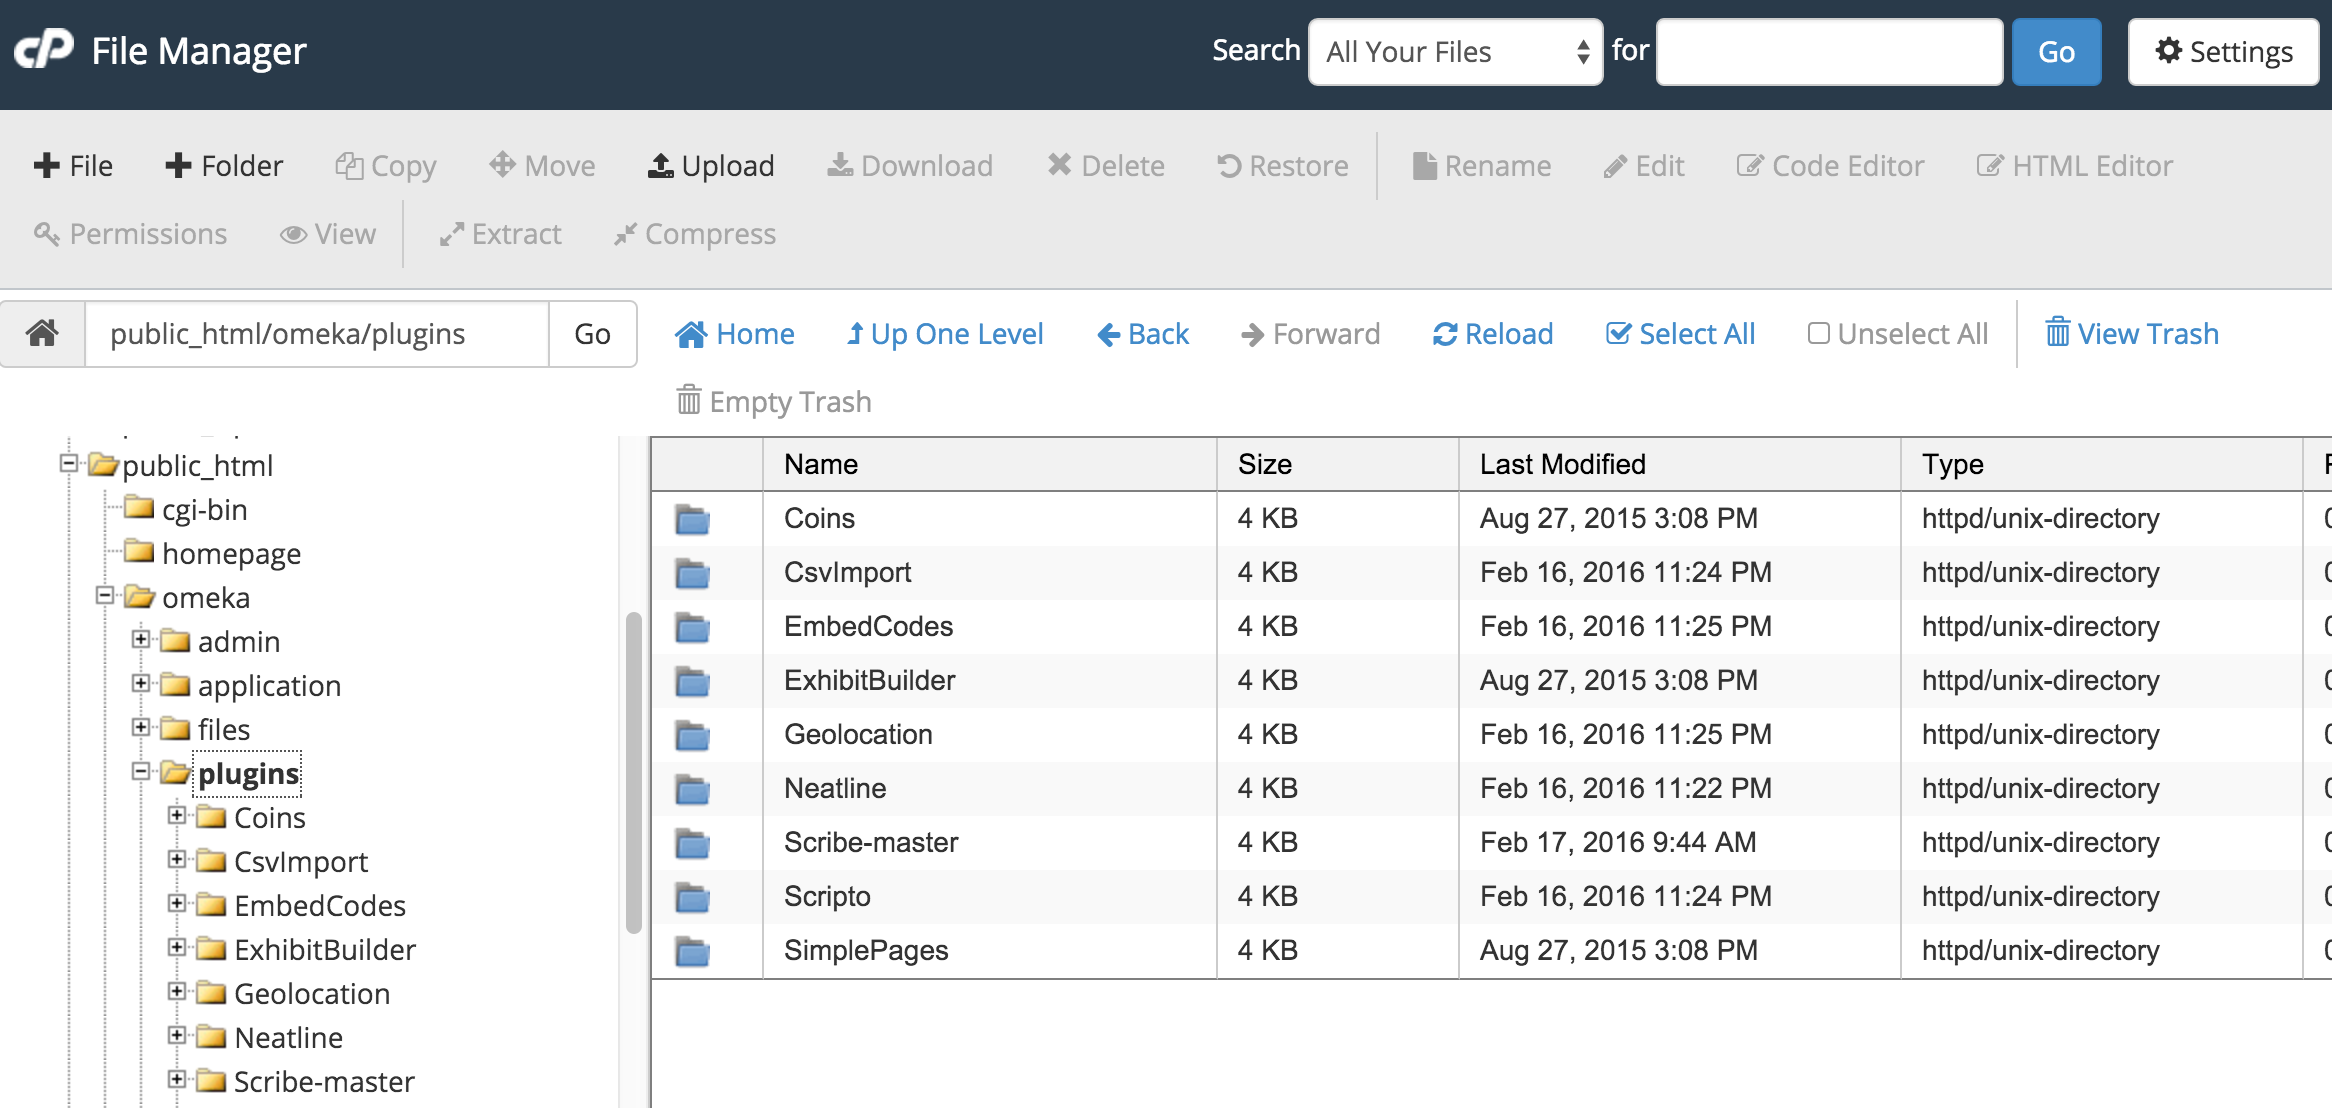
In the File Manager you’ll navigate on the lefthand sidebar down to your plugins folder which should be one of several folders within your Omeka install (your root directory for your domain is public_html).

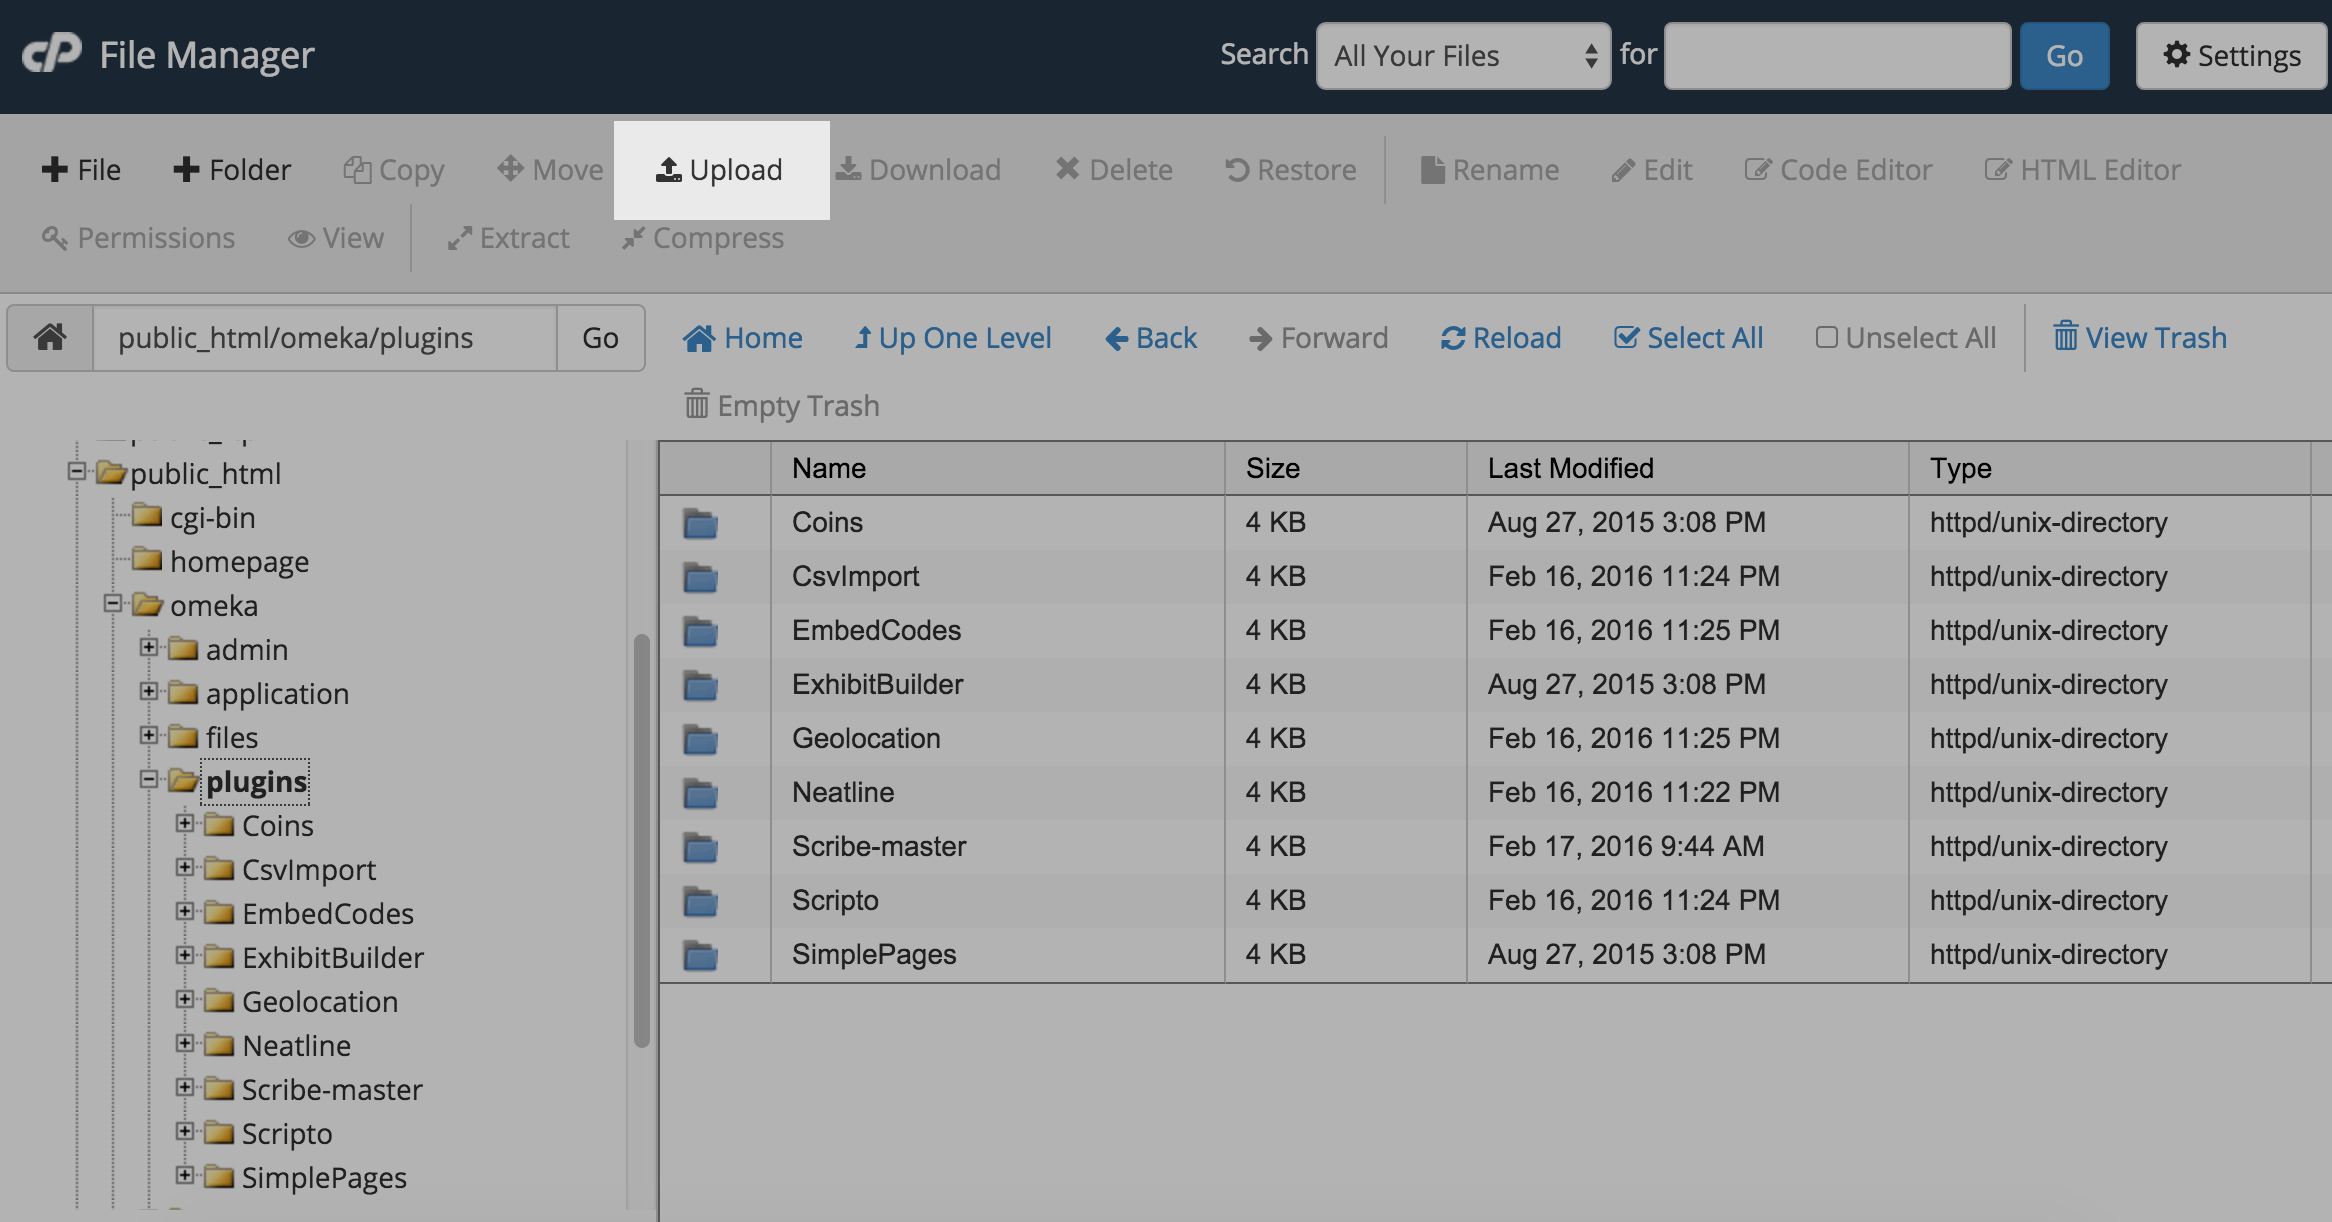
Here you will see all plugins currently in your Omeka install. To add a new one you want to have downloaded the zip file locally to your computer from Omeka’s website first. Then click the Upload button to upload the file.

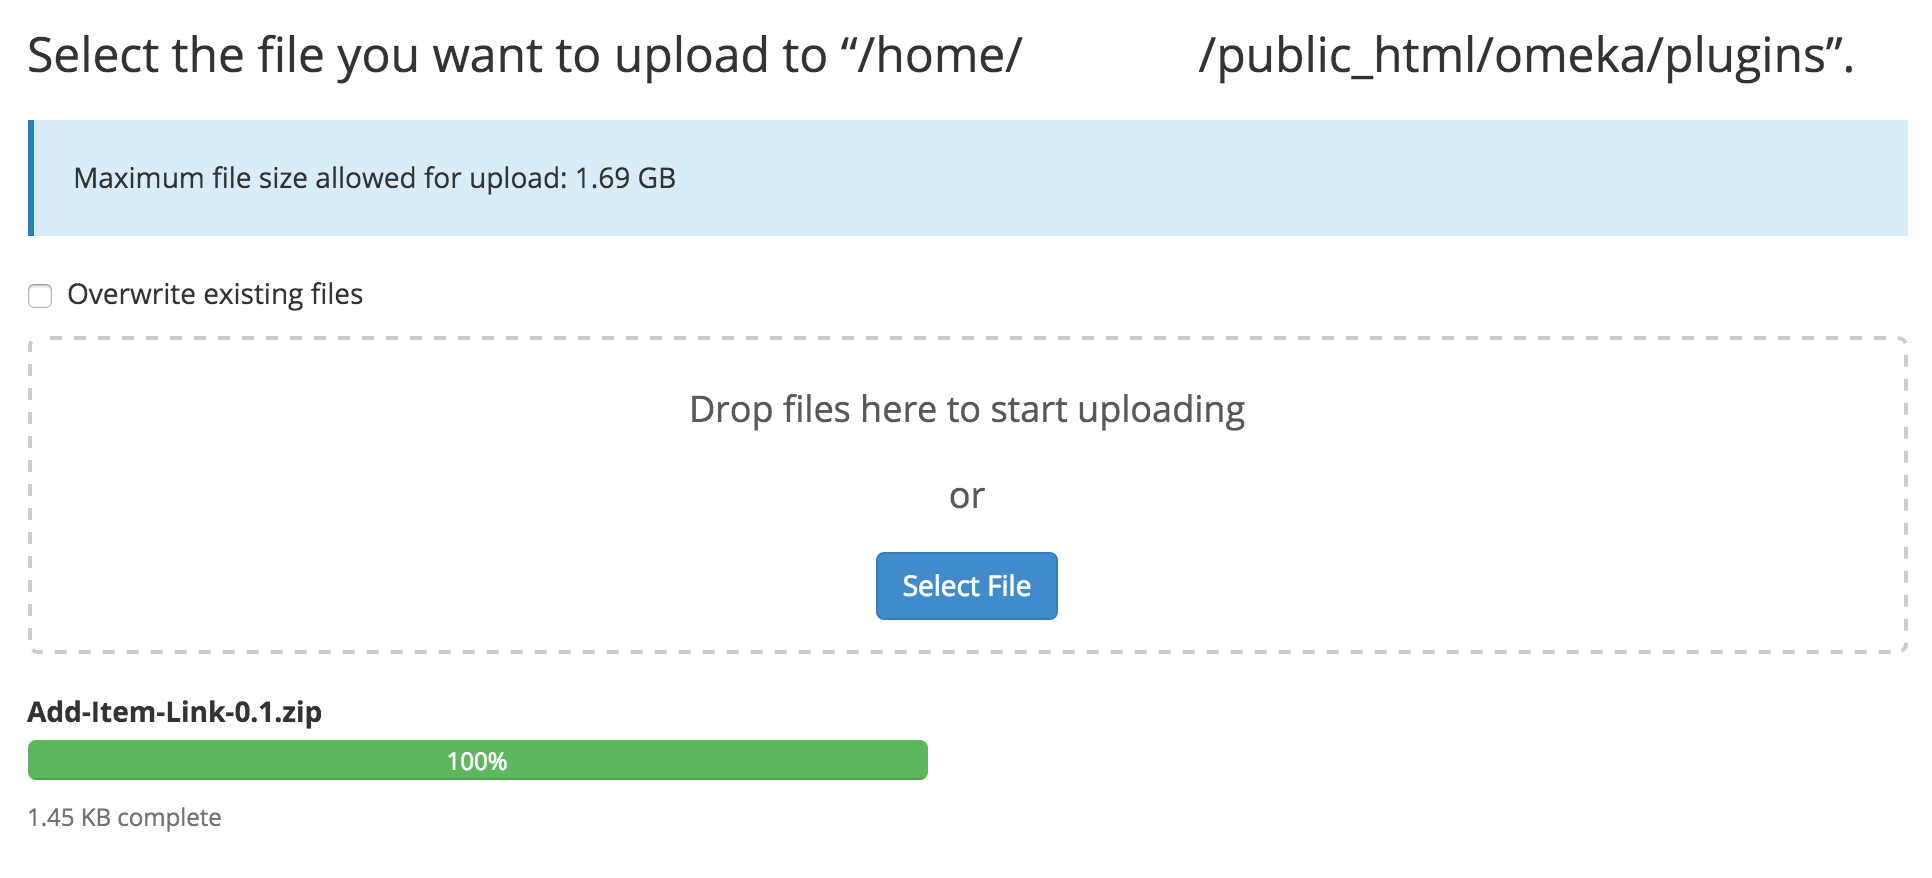
The interface will allow you to drag and drop or select from your computer one or more zip files for the plugins you wish to upload. Once the upload has completed you can return to the previous screen using the link at the bottom of the page.

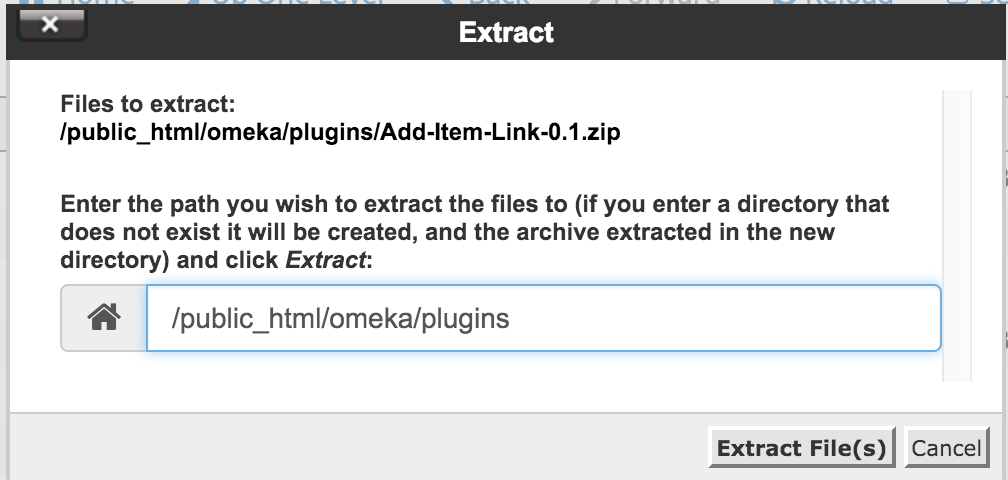
You should now see a zip file for your plugin in the plugins folder. The last step is to extract the contents of the zip file to the same folder. To do this select your file and click the Extract button.

Once the plugin is extracted you can delete the zip file and the plugin will now be available for activation within your Omeka administration interface.

WordPress

WordPress is an online, open source blog application. Powering over 30% of the web, WordPress is easily one of the most popular content management systems (CMS) in existence today. WordPress forked from b2/cafelog in 2003, and WordPress MU multiple website functionality has been integrated since 2010. You can read more about the WordPress backstory here.


Registering a Domain

This web hosting space currently utilizes both subdomains of your school’s project URL and top-level domains (a .com, .net, .org address) after initial signup. You have the option to start with a free subdomain and then later decide you’d like to purchase a top-level domain after using the space.  You can do this by registering a domain with a service provider (we make a recommendation below, but any domain provider should work) and adding it to your space as an Addon Domain.

To start you’ll need to get the domain registered. When choosing a domain we recommend keeping it all lower-case, avoiding hyphens, keeping it short, and of course it will need to be a unique address. Reclaim Hosting has made the process of registering a domain quite simple, and the domain will work with very few additional steps due to the integration they have with our hosting system. To register a domain, click here and type in the domain you’d like to purchase:

screenshot of domain registration at reclaim.com

After ensuring the domain is available for purchase you’ll be prompted to select whether you’d like to protect the contact information associated with the domain. This option (referred to as ID Protect) is free to add. We recommend checking this ID Protect box to protect your contact information.

You’ll also be prompted for nameservers for the domain. If registering the domain through Reclaim Hosting you can leave these with the default. If you decide to register the domain elsewhere, you’ll want to point the nameservers to ns1.reclaimhosting.com and ns2.reclaimhosting.com in order for the domain to work with our system.

Once you’ve completed the checkout process with payment information the domain will be registered automatically.

The last step is to connect it to your existing cPanel hosting account. To do that you’ll navigate to your cPanel > Domains > Add-on Domains.

On the following page, type your newly purchased domain in the new domain name field. (The subdomain and Document Root fields will populate automatically.)

You can change the document root (the directory of your files) if you wish. Some folks like to remove the “.com” from the Document Root field for the convenience when using FTP. The option to create an additional FTP account is present but not necessary. Once the domain is entered click Add Domain to add the domain to your hosting account.

At this point, the domain will now be hosted in your account and you can use it to install applications, upload files, and any number of other actions available to you in cPanel.

Migrate to Reclaim Hosting

Step One: Signing up for an Account

The first step will be to sign up for an account at Reclaim Hosting. This link will take you directly to their Student/Individual Hosting plan option.

– If you already have a Top-Level domain (i.e. yourdomain.com) choose the I will use my existing domain and update my nameservers option.

– If your current website content exists on a subdomain (i.e. yourdomain.create.humboldt.edu), select the Register a New Domain or the Use a subdomain from Reclaim Hosting option.

– Enter a new top-level domain name if applicable.

– Complete the sign-up process/pay invoice.

Complete the sign-up process/pay invoice.

Step Two: Let Reclaim Hosting Know

Send a support request to support@reclaimhosting.com with the following message:

Hello Reclaim Hosting Support,
I am graduating from (your school) and I would like to migrate my account, (your domain), to Reclaim Hosting. Please let me know if you need anything else from me.
Best,
(Your Name)

A member of Reclaim Hosting support will respond & help you get your account migrated ASAP.